Szechuan Shui zhu fish dish by Jiaqing Pan (Photo credit: Wikipedia)
The Szechuan style of cuisine arose from a culturally distinct area in the central-western part of China, a province known as Sichuan. This area of China came into its own culturally towards the end of the Shang Dynasty, during the 15th century. However, it was also the climate of the area that helped to shape the culinary traditions that were to arise from Sichuan province and make their way into the realm of international cuisine.
The province from which the cuisine that the world knows as Szechuan evolved is often hot and humid, and this contributed to this necessity of preparing foods in ways that differ significantly from other regions of China. Szechuan cuisine is primarily known for its hot and spicy dishes, though naturally there is more to Szechuan food than spice and sauces rich and strong in flavor.
A general overview of culinary history and trends reveals that, for the most part, areas that tended to spice heavily were areas in which the fresh food supply was not as reliable as in places that traditionally used a lighter hand in their use of spices. The climate of Sichuan is conducive to faster food spoilage. This, particularly in the past, made necessary food preservation techniques that themselves left behind a strong flavor, such as salting, pickling, drying, and smoking. Thus, spices served to mask the flavors of less than fresh foods and those that have been preserved by methods that affect their natural flavors. In addition to masking certain flavors, the use of hot spices, such as chili peppers, tends to be more common to hot climates, as the sweat that they can produce is thought to cool the body.
Much of the spicing of regional Chinese cooking is based upon bringing together five fundamental taste sensations – sweet, sour, pungent, salty and bitter. The balance of these particular elements in any one dish or regional cuisine can vary, according to need and desire, especially as influenced by climate, culture and food availability.
In Szechuan cuisine, there are a variety of ingredients and spices used to create these basic taste sensations. These include a variety of chili peppers, peppercorns over various types, Sichuan peppers, which are in reality a type of fruit, not pepper, and produce a numbing effect in addition to their warm flavor. Sichuan peppers, also called flower pepper and mountain pepper, are a traditional part of the Chinese five-spice powder, or at least of those that are modeled upon the most authentic versions of the spice combinations common to regional Chinese cooking.
Other ingredients used commonly in Szechuan cuisine to create the five fundamental taste sensations include different types of sugars, such as beetroot sugar and cane sugar, as well as local fruits for sweetness. The sour comes from pickled vegetables and different varieties of vinegar. A special bitter melon is added to many dishes to offer the touch of bitterness that complements other flavors. Other spices and flavors include dried orange peel, garlic, ginger, sesame oil and bean paste. Salt is important to Szechuan cuisine, and the area produces uniquely flavored salts that help to distinguish authentic Szechuan cuisine from the other regional cuisines from China.
Szechuan cuisine is marked by its rich traditional flavors, which stem from a culture of hundreds of years and are in part shaped by the natural forces of climate. Authentic Szechuan cuisine offers a unique dining experience made up of adventurous and creative taste sensations.
Assorted bell pepper fruits from Mexico (Photo credit: Wikipedia)
Where did peppers come from?
One of the most common genera of peppers, known as the capsicum, is thought to have been in existence millions of years ago in present-day Bolivia, according to the Chicago Botanic Garden's Information and Resources. But, the first known cultivation of peppers happened in Mexico and Central, as well as South America 10,000 years ago. The probable spread of these crops from Bolivia to these areas is attributed to birds. The capsicums existed mainly in the Americas until about 1600. Christopher Columbus' voyages were helpful in spreading capsicum peppers throughout the world.
The original peppers were tiny and round, unlike most of today's peppers which are long and larger.
What can I do with peppers?
Most commonly, peppers have been used to spice up generally boring foods like rice or corn. Through the years though, people have come up with a whole slew of uses for peppers from making pepper jelly, to using ornamental peppers for garlands. Here's a list of the most interesting as well as some of the more common uses for peppers:
Pickled Peppers
Pepper Jelly - Dried Apricot Jalapeno Jelly
Roasted Peppers
Adding Peppers to pasta dishes
Hot Sauce
Pepper Garlands/Decorations
Using peppers in the stirfry
Pepper vinegar
Pepper spray (animal deterrent for plants)
What different types of peppers are there?
There all sorts of classifications for peppers. There is the scientific classification method that uses the genus and species name: The most commonly known and cultivated genus of peppers is the capsicum, whereas the five most common species of peppers (all within the capsicum category) include: chinense, frutescens, pubescent, annum, and baccatum. All of these types of peppers are also labelled chillies.
There is the usage method which categories various peppers into hot, sweet, or ornamental. And then, there is the location-classified method that is what gives some peppers its actual name.
Here's a basic list of some of the varieties of the mentioned species of peppers you might see in your local grocery stores:
Bell pepper
Anaheim pepper
Fresno
Poblano
Habanero
Cubanelle
Chipotle
Jalapeno
Serrano
Mariachi
Aside from the different coloured bell peppers used in stirfry, many of these other peppers are considered hot peppers.
How can you tell how hot a pepper is?
The range of spiciness for peppers is measured in Scoville units. Wilbur Scoville developed a scale to help determine this very issue and measure pepper pungency in 1912. The higher the number of Scoville units, the hotter the pepper. Here's a basic Scoville Scale. that shows habaneros trumping chipotles and jalapenos as the most commonly known hottest pepper.
Health Effects
Regular pepper consumption is thought to have both good and bad effects on one's health. One of the clearest effects of eating peppers is what it does for congestion. Eating peppers, especially those hot ones, will help clear up your nasal passages in no times (as will most spicy foods!)
According to a University study, consuming peppers regularly can help the body control its amount of insulin, which would be very beneficial for diabetics. Other studies show though that pepper digestion can increase the risks of stomach cancer, the definite answer remains unclear. Research has also been linking peppers to helping stop the spread of prostate cancer in some men.
Paella is a saffron-flavored dish made with varying combinations of rice, vegetables, meat, chicken, and seafood. Spain and the Catalan languages, paella means frying pan or pot. The traditional paella pan is flat and of large diameter, it can also have handles on each side.
In fact, paella is one of the most versatile dishes to make. Paella also has the advantage of being great to clean out the fridge and use up leftover meats and vegetables. Any combination will eventually be great the secret is in the chemistry. Spanish Paella is a dish that is generally made to feed several people. Moreover, Spanish Paella is quite flavorful the next day as the tastes have had time to mix together and become stronger.
Here are three basic steps to follow to make wonderful Spanish Paellas while leaving you the latitude to be creative and to make the dish their own by customizing it to their taste.
1. Preparing the rice.
Select a type of rice that you are comfortable using. Feel free to experiment but know that Spanish Paella contains a lot of ingredients and if you are unhappy with the end result with a particular type of rice, you might end up with a lot of waste. Basmati, brown, or a mix with wild rice can add great taste and texture. Follow the instructions on the package with regards to washing and cooking the rice. Finely chop some onion, garlic, and tomato. Heat a saucepan and add olive oil once the saucepan is hot (make sure that the oil does not start smoking. Burnt olive oil is carcinogenic and quite unhealthy). Once the oil is hot, throw in the uncooked rice. Frying uncooked rice gives it a nutty taste. Let the rice fry in the saucepan for a minute or so. Add the chopped onion, garlic, and tomato until they soften, mixing constantly. Spice with saffron, salt, and pepper. Feel free to experiment. Cumin, Cayenne various fine herbs, or even a bit cinnamon or cloves can easily be added for a flavoring of your own. This mixture should not be on the stove for more than three to five minutes. At high heat with constant mixing, none of the ingredients should stick but they should mix well together and soften. Once all the ingredients are combined, remove the saucepan from the burner and mix in some frozen peas. Add enough peas to make a well-balanced mixture.
2. Choosing and making meat.
In a frying pan at high heat, brown some pieces of chicken. Upper thighs, drumsticks, breasts...it's all good. Do not cook the meat completely but brown the outside. Once browned, set the meat aside. Lamb can also add great flavor to your Spanish Paella.
3. Combination of it all
Cover the bottom of the Spanish Paella pan with the uncooked rice mixture. Add the browned chicken pieces on top. Add uncooked shellfish and small fish filets rolled up and fastened with a toothpick or string. Use any type of fish but make sure that its flesh will hold well together. Pour some chicken broth on top (if the broth is warm the cooking time will reduce). Note that you can also add wine for more flavor. Cover the Spanish Paella dish and cook for about 45 minutes at 350 Fahrenheit or until the rice is fully cooked. At this point, you can add raw shrimp or muscles and cook uncovered for another five minutes.
In short, the secret to preparing the perfect Spanish Paella is to make it your own!
Tuna steak served in a French bistro (Photo credit: Wikipedia)
Looking for a delicious and simple way to grill up that fresh tuna steak that you just caught or bought from the local seafood market?
Grilled tuna steak is a delightful and exciting entree for any special meal. There are various methods to spice up and flavor your catch, but today we want to talk about a popular method using wasabi powder. This unique spice is being used by many top chefs to add a special flare and flavoring to the tuna.
Assemble the following recipe ingredients:
• tuna steaks, cut to a thickness of 3/4 inch to 1 1/2 inch each ( your preference )
• 4 to 6 ounces of butter
• 1 cup of teriyaki marinade
• 1 tablespoon of wasabi powder
• 2 chopped green onions
• 1 tablespoon of olive oil, peanut oil, or vegetable oil
• salt and pepper to taste
Get started by marinating the tuna in the teriyaki marinade. Place the tuna into the marinade and completely coat both sides of the meat. Cover, place into the refrigerator and let the tuna sit and marinate for an hour or more, overnight is good too.
When ready, start up your grill and get it good and hot, but not too hot. Ideally, bring it to the same temperature as if you were grilling a regular beef steak on the grill. Then mix the wasabi powder, butter, and the green onions together and place it aside for the time being. Once the grill is to the ideal temperature and you are ready, then brush the oil onto the tuna steaks and season the meat with salt and pepper to taste. While grilling, periodically baste the tuna with the leftover teriyaki marinade. This will help to keep the tuna moist and add additional flavor. Cook until they are done to your desired temperature, then serve with the butter. You can also let some butter melt on the tuna fillets as they are cooking as well.
An alternative set of recipe ingredients and marinade flavoring:
• tuna steaks, 1-inch thick
• Sesame oil
• 1 rounded tsp. cornstarch
• 1/3 c. rice vinegar
• 1/3 c. mirin
• 1/3 c. soy sauce
• 3 tbsp. minced crystallized ginger
Popular tuna species:
Tuna is a popular, delicious, and rich tasting seafood that is prepared in many ways. It is perfect for grilling, sautee, and broiling. The flesh of tuna is pink because the tuna's muscle tissue has a higher oxygen capacity than other fish species.
• Bluefin: An important source of seafood, providing much of the tuna used in sushi. It is a particular delicacy in Japan where it has been reported that the price of a single giant tuna can exceed $100,000 on the Tokyo fish market.
• Yellowfin: found in open waters of tropical and subtropical seas worldwide, though not in the Mediterranean Sea. It has been reported to be up to 94 inches in length and 440 lb in weight. The second dorsal fin and the anal fin are both bright yellow, thus the common name, and they are very long, as are the pectoral fins. The main body is very dark metallic blue, changing to silver on the belly.
• Albacore: found in the open waters of all tropical and temperate oceans, and the Mediterranean Sea. It is a prized food and a significant fishery. Methods of fishing include rod and reel, long-line fishing, and purse seining and are highly sought after by sport fishers and recreational fishermen.
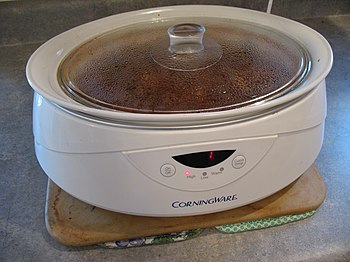
A slow cooker Oval Crock Pot (Photo credit: Wikipedia)
According to wikihow.com, “Beef stew is best cooked over low heat for a long period of time, making it a perfect candidate for crockpot cooking. Traditional beef stews are made from cuts of beef like chuck roast, but you can also make a slow-cooked beef stew using meatballs formed with ground beef. Keep reading for more information about cooking various types of beef stew in your crockpot.”
Here are the ingredients for a traditional beef stew
“Heat the oil in a large skillet. Pour the oil into a large skillet and heat on the stove over medium-high heat. Meanwhile, make sure that your beef and vegetables are already prepared. The beef should be cut into 1-in (2.5-cm) cubes. You can usually find pre-cut beef stew meat in the butcher's department at the grocery store, but if not, you can trim and cut a chuck roast or bottom round cut.
The garlic clove should be minced. If using pre-minced garlic, use 1/2 tsp (2.5 ml). If using garlic powder, use 1/8 tsp (0.625 ml).
The onion and celery should be roughly chopped.
You can use 3 large baking potatoes or 6 to 9 baby potatoes.
Use 4 standard carrots or 2 cups (500 ml) baby carrots”
Here is another method from the same website, “Coat the beef with flour, salt, and pepper. Mix the flour, salt, and pepper in a large bowl. Add the beef to the mixture and toss to coat.
Make sure that the flour, salt, and pepper are thoroughly combined before adding the beef.
Stir the beef well so that all sides of each piece are covered. You should have little to no flour left once done.
Coating the beef in flour allows the beef to brown better and also makes the finished stew thicker.”
Here is the method of using a slow cooker, “Place all the beef stew ingredients in the slow cooker. Transfer the beef to the crockpot. Layer the potatoes, carrots, onion, celery, and garlic on top. Add the bay leaf, paprika, and Worcestershire sauce, then pour the beef broth over everything”
“The exact order of ingredients does not matter much, but for best results, the beef, potatoes, and carrots should make up the bottom three layers since these ingredients require the most heat to cook through. Note that the heating element of the crockpot is located on the bottom of the device.”
“Keep the crockpot covered as the stew cooks. A slow cooker needs to build up heat in order to cook properly, and the heat will be unable to build up if the lid is kept off or removed during the cooking process”
A cook sauteed onions and peppers. (Photo credit: Wikipedia)
Cooking is an essential skill for everyone to have whether you’re male, female, old or young. Obviously, if you don’t have minimal cooking skills you would end up eating out all the time or having to hire someone to do the cooking for you. As essential as cooking is of course not everyone has a knack for it and not everyone enjoys doing it. There are some that like more complicated meals because it’s a change to their everyday meals, while others enjoy something quick and simple. Below are a few reasons why keeping it simple might be better than going all out in the kitchen.
Ingredients Are Typically in Your Pantry
Basic cooking typically does not require a lot of ingredients, and if it does they are basic staples that most people have available. When cooking gourmet meals or more complex recipes in most instances you will have to go to a grocery store or two in order to find everything that you need.
It Saves You Time
Basic cooking is generally not going to be a long drawn out process. It is really cut and dry and to the point. You get your ingredients, you prep, and you cook. Complicated recipes can sometimes be a long process. Sometimes you have to let things sit for hours, marinate overnight, and everything in between in order for it to taste good. If you don’t have room in your schedule, complex recipes can be a real pain as opposed to a basic cooking recipe which would be done in an instant without all the hassle.
Essential Tool for Any Age
Not everyone needs to know how to make soufflé in order to survive, BUT if you don’t know the basics of cooking you’re doomed to take out which can become really unhealthy over time. Basic cooking is an essential tool for people of all ages and genders.
Less Stress
Trying to make sure that a gourmet meal comes out just right can be a lot of stress. There are certain techniques you must learn, different tools you will need, and the entire process can be draining, to say the least. However, when you cook something really basic you’re not as stressed on how it will come out or if you have enough skill to master it to perfection.
Basic cooking is just all around better for the average Joe of cooking, for the master chefs it might be a bit boring though. You can typically find recipes easy, the ingredients are simple, the prep time is less, and more importantly, you won’t be stressed out about it. Basic cooking is a staple that everyone should know for minimal survival which is why in this case it is much better than complicated cooking. The good news, however, is that once you’ve gotten your basics down packed you can always add a flare of your own to the recipe to make it a bit more complicated than before.
Cereal is the name given to those seeds used as food (wheat, rye, oats, barley, corn, rice, etc.), which are produced by plants belonging to the vast order known as the grass family. They are used for food both in the unground state and in various forms of mill products.
The grains are pre-eminently nutritious, and when well prepared, easily digested foods. In composition, they are all similar, but variations in their constituent elements and the relative amounts of these various elements, give them different degrees of alimentary value. They each contain one or more of the nitrogenous elements, gluten, albumen, casein, and fibrin, together with starch, dextrin, sugar, and fatty matter, and also mineral elements and woody matter, or cellulose. The combined nutritive value of the grain foods is nearly three times that of beef, mutton, or poultry. As regards the proportion of the food elements necessary to meet the various requirements of the system, grains approach more nearly the proper standard than most other foods; indeed, wheat contains exactly the correct proportion of the food elements.
Being thus in themselves so nearly perfect foods, and when properly prepared, exceedingly palatable and easy of digestion, it is a matter of surprise that they are not more generally used; yet scarcely one family in fifty makes any use of the grains, save in the form of flour, or an occasional dish of rice or oatmeal. This use of grains is far too meager to adequately represent their value as an article of diet. Variety in the use of grains is as necessary as in the use of other food material, and the numerous grain preparations now to be found in market render it quite possible to make this class of foods a staple article of diet, if so desired, without their becoming at all monotonous.
In olden times the grains were largely depended upon as a staple food, and it is a fact well authenticated by history that the highest condition of man has always been associated with wheat-consuming nations. The ancient Spartans, whose powers of endurance are proverbial, were fed on a grain diet, and the Roman soldiers who under Caesar conquered the world, carried each a bag of parched grain in his pocket as his daily ration.
Other nationalities at the present time make extensive use of the various grains. Rice used in connection with some of the leguminous seeds, forms the staple article of diet for a large proportion of the human race. Rice, unlike the other grain foods, is deficient in the nitrogenous elements, and for this reason, its use needs to be supplemented by other articles containing an excess of the nitrogenous material. It is for this reason, doubtless, that the Chinese eat peas and beans in connection with rice.
We frequently meet people who say they cannot use the grains, that they do not agree with them. With all deference to the opinion of such people, it may be stated that the difficulty often lies in the fact that the grain was either not properly cooked, not properly eaten, or not properly accompanied. A grain, simply because it is a grain, is by no means warranted to faithfully fulfill its mission unless properly treated. Like many another good thing excellent in itself, if found in bad company, it is prone to create mischief, and in many cases, the root of the whole difficulty may be found in the excessive amount of sugar used with the grain.
Sugar is not needed with grains to increase their alimentary value. The starch which constitutes a large proportion of their food elements must itself be converted into sugar by the digestive processes before assimilation, hence the addition of cane sugar only increases the burden of the digestive organs, for the pleasure of the palate. The Asiatics, who subsist largely upon rice, use no sugar upon it, and why should it be considered requisite for the enjoyment of wheat, rye, oatmeal, barley, and other grains, any more than it is for our enjoyment of bread or other articles made from these same grains? Undoubtedly the use of grains would become more universal if they were served with less or no sugar. The continued use of sugar upon grains has a tendency to cloy the appetite, just as the constant use of cake or sweetened bread in the place of ordinary bread would do. Plenty of nice, sweet cream or fruit juice, is a sufficient dressing, and there are few persons who after a short trial would not come to enjoy the grains without sugar, and would then as soon think of dispensing with a meal all together as to dispense with the grains.
Even when served without sugar, the grains may not prove altogether healthful unless they are properly eaten. Because they are made soft by the process of cooking and on this account do not require masticating to break them up, the first process of digestion or insalivation is usually overlooked. But it must be remembered that grains are largely composed of starch, and that starch must be mixed with the saliva, or it will remain undigested in the stomach since the gastric juice only digests the nitrogenous elements. For this reason, it is desirable to eat the grains in connection with some hard food. Whole-wheat wafers, nicely toasted to make them crisp and tender, toasted rolls, and unfermented zwieback, are excellent for this purpose. Break two or three wafers into rather small pieces over each individual dish before pouring on the cream. In this way, a morsel of the hard food may be taken with each spoonful of the grains. The combination of foods thus secured, is most pleasing. This is a specially advantageous method of serving grains for children, who are so liable to swallow their food without proper mastication.
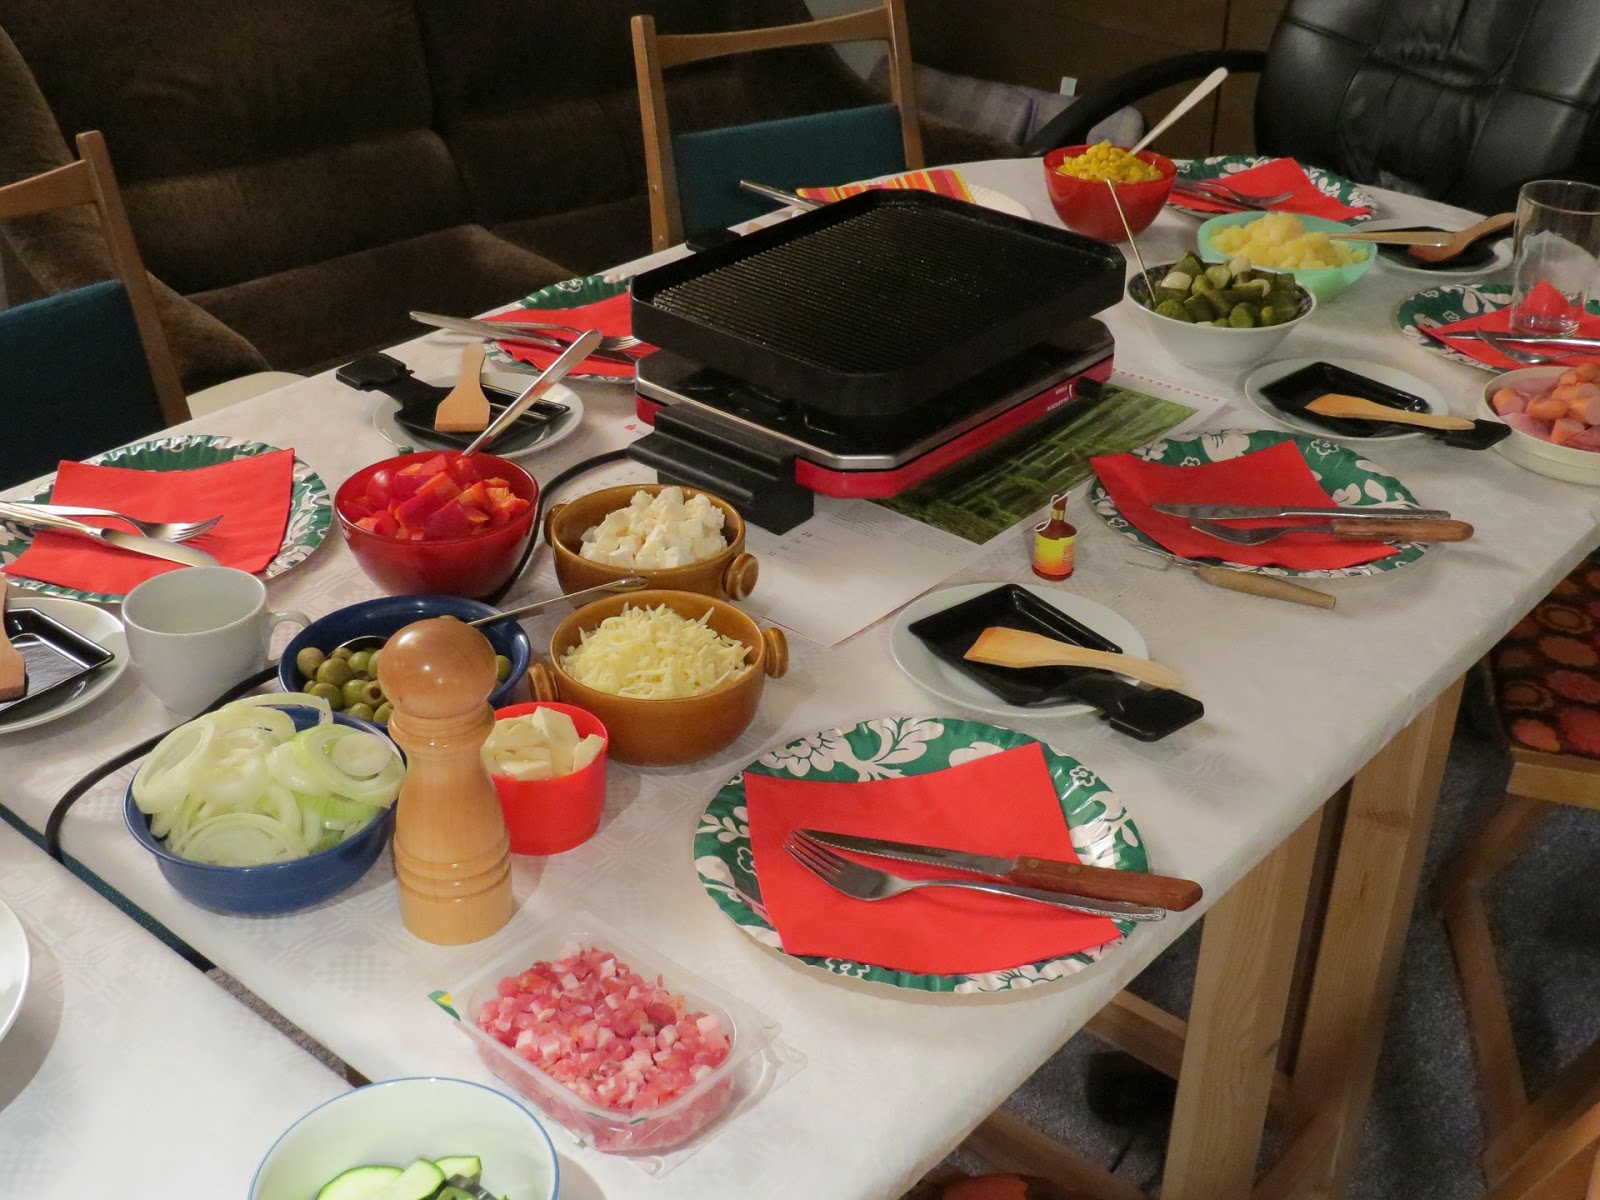
Yes, the fondue pot of the ’70s was pretty cheesy, but in this century, nothing is more cheesy than raclette. In recent years fondue pots have experienced a resurgence in popularity, and with them has come to the raclette grill. Though not traditionally well known in the US and Canada, raclette is suddenly experiencing a boom in popularity.
Raclette is a semi-soft, relatively mild, easily melted cheese from Switzerland. The term also refers to the cooking method of melting cheese at a tabletop grill and serving with a variety of accompaniments.
Legend has it that the original method for melting the raclette cheese began when Swiss herdsmen settled down for the night in their camps. They placed a hunk of cheese near their campfire and as it melted, scraped it off onto a slice of bread.
Today, this same meal is mimicked but with a much greater variety of foods, and with electric raclette grills that are much more convenient. Though the melting method has changed over the years, this simple and entertaining meal has remained just as enjoyable for entertaining evenings with friends and family.
There are several kinds of raclette grills that you can choose from. Traditional raclette grills hold a half- or quarter-round of raclette cheese on an angle, with a heating element melting the surface of the cheese, which drips onto a plate of dried meats and other accompaniments.
Today, the most common raclette sets include a cheese-melting element with a grill for cooking meats at the table. They provide up to 8 people with individual cheese pans and feature non-stick, dishwasher safe surfaces for convenience and easy cleanup. Perfect for entertaining!
Portable raclette using fondue-type burners are also available for camping and picnicking.
A raclette grill can provide not only a delicious, hot-off-the-grill meal but also provide a lot of fun for family and friends. For optimum enjoyment, serve traditional raclette with a Fendant or other light-bodied dry white wine. If you are grilling meats, serve a wine appropriate for the meats.
A traditional Swiss raclette meal uses raclette cheese with the following accompaniments:
- baguette bread
- small cooked potatoes
- small gherkins
- pickled onions
- charcuterie meats such as salami or prosciutto
You can also get very creative with a raclette meal. A departure from tradition – but an adventure in taste – could include:
Raw meat for grilling and dipping into sauces:
- Italian sausage cut into 1/4” slices
- Chicken tenderloins cut into 1” pieces
- Beef tenderloin cut into 1/2” cubes
- Shrimp and Scallops
Thinly sliced cheeses:
- Brie
- Camembert
- Oka
- Cheddar
- Cambozola
Vegetables blanched to al-dente, such as:
- Mushrooms
- Broccoli
- Cauliflower
- Asparagus
Here are two excellent recipes for dipping sauces for your meats and vegetables:
Pimento Sauce
3/4 cups mayonnaise
1/4 cup sour cream
2 tablespoons tomato sauce
1/2 cup canned pimentos or 1 red bell pepper, roasted with skin removed
Salt and pepper, to taste
Blend all ingredients in a blender. Season to taste. Serve chilled.
Cucumber Garlic Sauce
1/2 cup mayonnaise
1/2 cup plain yogurt
1/2 cup sour cream
2 cloves of garlic, finely chopped
1/2 teaspoon salt
1/4 cucumber, peeled and finely chopped
1 tablespoon of finely chopped chives or green onion
For this recipe, I use either muscovy duck, a Brazilian breed which is known for its incredible flavour and lean profile, or wild-hunted duck. Other breeds, such as moulard or Pekin, will do fine, but be aware that the principal difference among these types of duck is the fat cap underneath the skin. With any breed of duck, to cook it properly, you want to render the fat from under the skin of the breast at a cooking temperature and time that will allow the skin to brown perfectly, once all the excess fat is rendered away.
For all breeds, lightly score the duck breast, skin side, so that the skin is pierced (freeing the fat to render away), without going into the flesh of the breast. To do this, you will need a sharp knife. Score the breast at 45 deg. angles, so you end up with a diamond pattern on the skin side of the breast.
To prep, the duck for cooking, score it and season it with salt and pepper on both sides. Allow the duck to rest for 30 minutes. When you are ready to serve, do not add butter or oil to your pan - just set the duck, skin side down, in the pan and cook over low to moderate heat. As the fat renders away, pour it off. You want to adjust your heat, and your time in cooking the skin side, so that most of the fat is rendered about the time your skin is browned nicely.
For 6
6 hen breasts, or 3 drake breasts (of mould or Muscovy), each portion being app. 8 ounces, uncooked.
Corn Crepes
Corn Crepes
4 cups corn kernels (about 4 ears)
salt
white pepper
1 ½ cups flour
4 eggs
1 ½ cups milk
3 tbsp melted butter
nutmeg (a couple of pinches)
4 tbsp minced chives
Olive Oil
Heat oil in a pan over medium heat. Add corn, salt and pepper and cover, cooking about 3-4 minutes and tossing through a couple of times. Process in food processor and cool. Once cool, add flour, eggs, milk, butter and nutmeg. Blend until smooth. Fold in minced chives. Refrigerate at least 3 hours. Prepare crepes with olive oil in non-stick per s.o.p. Cool and set aside. At service, take 3 crepes and reheat gently. Fold into triangles.
Sage-Sour Cherry Sauce
2 cups pinot noir or good burgundy
1/3 c shallot, minced
1 cup sliced, dried tart cherries
2 cups duck demi-glace, 4 cups (thin) duck stock, or 2 cups demi-glace (more than gourmet will work o.k.)
1 tsp minced sage
pinch of minced thyme
1/3 tsp balsamic vinegar
salt
pepper
Simmer wine with shallots, cherries and duck sauce until reduced back to 2 cups. At service, bring 2 ounces of sauce (with cherries) to simmer and toss in sage, thyme and balsamic vinegar together and heat through. Season with salt and pepper and serve.
At Service
Pre-heat oven to 375F.
Fleur de Sel (top layer, harvested sea salt if you have it)
Sear duck as above. Once the skin is browned and fat is rendered, "kiss" flesh side approximately 1 minute and place in oven. Remove from oven when duck breast still has a good deal of easy "spring" to the touch - you do not want to go beyond medium (I prefer medium rare). Remove the duck from the cooking/roasting pan and cover loosely with foil, shiny side out. Meanwhile, reheat crepes in a pan with a touch of olive oil, fold in triangles and place in an overlapping mound at the centre of the plate. You also want to saute some coarsely chopped rainbow chard, which adds some caramelized sugar, bitterness, and colour to the plate (use organic if possible - it will contain more natural sugars). Thinly slice duck and arrange on either side of crepes; drizzle with warmed sauce (including cherries), and place a few crystals of fleur de sel over the meat (if you have it).
You invest a lot of time and money into the steaks for a special occasion and when dinner time comes, they are tough. What happened? How can you cook steaks as tender as your favorite restaurant?
The first step to cooking a good steak is to choose the right grade of steak. The top quality beef is graded USDA Prime and commands top prices. USDA Prime grade meats are sold to the restaurant industry and specialty markets and are not as likely to be found at your local grocery chain. The next grade of beef is USDA Choice. USDA Choice is tender, flavorful and only slightly lower in quality than USDA Prime. The meat is well marbled with fat and will be tender and juicy when properly prepared. USDA Choice makes up about 70% of all graded beef and is readily available in your supermarket. USDA Good graded beef is an acceptable grade of beef that has only minimal marbling of fat. It is leaner, but may not be as tender as USDA Prime or Choice.
Next, look at the color and texture of the meat. A good steak should be firm to the touch, moist, and bright in color. It should be well marbled with thin streaks of white fat throughout and a thin crust of steak on the outside. In our fat conscious society, we tend to look for lean cuts of meat, but the thin streaks of white fat marbled throughout the meat are the key to a tender juicy steak.
The most tender and juicy steaks come from the sirloin, the short loin, and the rib. These steaks include the sirloin steaks, porterhouse steaks, t-bone steaks, rib steaks, Delmonico steaks, and the filet mignons. Steaks containing bone will weigh more than those without, but the bone adds flavor to the steak.
Aging is a desirable process that intensifies the flavors and makes the meat more tender. Aged steaks are more expensive and usually only found in high-end supermarkets and specialty markets. An aged steak is recognizable by its darker color.
Once you have purchased your steak, you can further increase the tenderness and juiciness by marinating it. Try a marinade made of ½ cup each good wine and olive oil mixed 2 Tablespoons of lemon juice or herb vinegar. Add any seasonings that you like such as garlic, freshly ground pepper, onion, or herbs. Place the steak in a ziplock bag, pour in enough marinade to just cover it, and refrigerate overnight. Marinating a steak like this will add flavor and tenderness. If you routinely store steak in the freezer before cooking, try pouring the marinade over the steak before freezing. The steak will marinate when thawing and be ready to cook.
There are meat tenderizers available to sprinkle onto your steak, and they certainly do tenderize the meat; however, meat tenderizers can sometimes over-tenderize the meat, changing the texture of the meat into mush. If you should choose to go this route, do it carefully.
When ready to cook, slash through the outside fat layer on the steak in a few places to prevent curling, but do not cut into the meat. The more tender steak cuts can be broiled, grilled, or pan-fried. Less tender cuts should be pan-fried or slow braised. Steak should never be cooked in liquid. When pan broiling, use a very heavy skillet such as an iron skillet or griddle and heat the pan before adding the meat. The heavy metal will hold the heat for proper heat distribution and not cool down when the steak is added. A hot pan will quickly sear the outside, trapping the moisture inside.
When cooking, try to turn the steak only once. Cook the meat until browned on one side and half done, then turn and finish the other side. Turning too often will stew the meat rather than searing it and produce a less juicy steak. When the steak is done, remove from the pan and allow to rest for a few minutes before serving.
While the meat rests you can make a sauce with the pan drippings if desired. Use your favorite sauce, or fry mushrooms and onions in the pan. When nearly done, add a tablespoon each of butter and flour and cooks until lightly browned. Add a splash of wine and loosen any bits that may be stuck to the bottom of the pan. Allow to cook until the thick, taste and adjust seasonings, and serve over the steak. Enjoy!
Chinese Rice dish in Basmati (Photo credit: Wikipedia)
Rice has been around for a very long time. It is known to have been cultivated for over 5,000 years and is thought to be one of the very first crops. With over 7000 varieties, rice has become the staple food of more than half of the world’s population. Most people have at least one rice dish that they particularly enjoy.
Asian countries produce approximately 90% of the world's rice and Asians eat as much as 300 pounds of rice per person per year. Americans eat a little more than 21 pounds of rice per person each year and the French consume about 10 pounds of rice per person annually.
In spite of its long history and worldwide popularity, many people today are uncertain about cooking rice for fear of inconsistent results. This article briefly discusses the benefits of including rice in a healthy diet and offers an array of tips and techniques for successfully preparing and safely storing rice.
Benefits of Including Rice in Your Diet...
Rice is an excellent food to help keep your body healthy. Rice has the following nutritional benefits:
Rice is a good energy source...
Rice is an excellent source of carbohydrates. Carbohydrates are broken down to glucose, most of which is used as energy for exercise and as essential fuel for the brain.
Rice is low in fat, cholesterol-free and low in salt...
Rice is an excellent food to include in a balanced diet. It is low in total fat and saturated fat, is cholesterol-free (therefore an excellent food to include in a cholesterol lowering diet) and contains negligible amounts of sodium.
Rice is gluten-free...
Some people are unable to tolerate the proteins found in wheat, rye, oats, and barley and should choose foods that are gluten-free. All rice is gluten-free, making rice the essential choice for those with gluten free dietary requirements.
Rice contains no additives or preservatives...
Rice contains no additives or preservatives, making it an excellent inclusion in a healthy and balanced diet.
Long Grain, Medium Grain and Short Grain...
Rice contains two starches, amylose, and amylopectin. The ratio of these starches determines the texture of rice. Rice with a higher amylose content is separate, light, and fluffy when cooked. Rice with a lower amylose content cooks into grains that are moister and tender, with a greater tendency to cling together.
Long grain rice - This is a generic classification for rice in which the milled grain is at least three times as long as it is wide. It contains the highest percentage of amylose (approximately 23 to 26 percent) so it is separate and fluffy.
Medium grain rice - This size classification is for rice grains which are less than three times as long as they are is wide. Medium grain is sometimes labeled ‘short grain’ to distinguish it from long grain rice. The cooked grains are moist and tender, and they cling together. It contains approximately 15 to 19 percent amylose and is typically used in recipes that call for a creamy consistency, such as rice pudding and paella.
Short grain rice - This rice is almost round (less than twice as long as it is wide). When cooked, this rice tends to be even more moist, tender, and sticky than medium grain. It is estimated to contain roughly 12 to 17 percent amylose and is commonly used for sushi.
Rinsing and/or Soaking Rice...
What about rinsing rice before cooking?
Modern processing techniques are effective at removing impurities and producing clean, consistent rice; however, many people still prefer rinsing rice prior to cooking. Some feel that one benefit of rinsing is to remove any loose starch thereby providing a fluffier, less sticky rice and more consistent cooking. Experiment with both techniques to determine which you like best.
What about soaking rice before cooking?
Some varieties of rice (e.g. Basmati) cook better after soaking. Soaking softens the grains for better texture and prevents breaking of brittle varieties. Most ‘sticky’ varieties of rice will not cook properly without soaking. Be certain to soak the rice if it is indicated in the recipe.
** Remember: If rice is rinsed or soaked before cooking, be sure to drain it thoroughly so that the liquid measurement will be accurate.
Basic Methods of Preparing Rice...
Absorption Method
The absorption method is the most popular method for cooking rice. It uses a set amount of rice and a set amount of water for a set amount of time. By the time the water is absorbed, the rice should be done. This is also the method by which most rice cookers work, though some employ a mixture of this and the steaming method.
Steaming Method
This is usually the preferred method for cooking sticky and clinging varieties of rice. Soaked and drained rice is put in a special steaming basket or pan over a pot or wok of boiling water and cooked with steam alone, without the rice ever touching the boiling liquid.
Proper Proportions...
Most methods of cooking rice require a measured amount of liquid to ensure a properly cooked product. The general rule is 2 parts of liquid to 1 part rice by volume; however, different varieties of rice may require slightly less or slightly more liquid. Always refer to the label instructions to verify the proper ratio of liquid and cooking time.
How to Store Rice...
Uncooked Rice
Due to its low moisture content, properly stored white rice should keep without losing quality for as long as 3 years. Store uncooked rice in a sealed container in a dry, dark, and cool place. If rice is expected to be used fairly soon, then a glass container on the counter or open cupboard shelf in indirect light is acceptable.
Cooked Rice
Allow cooked rice to cool completely, then store in a well-sealed container or zip-lock storage bag in the refrigerator. Stored cooked rice may breed pathogenic organisms and possibly cause food poisoning when eaten. Always keep cooked rice in the refrigerator and discard all leftover rice that is not used within 2 or 3 days.
Tips and Techniques...
Read the box or recipe for desired results. Since different varieties of rice are best when cooked using a particular method, be certain to follow recipe instructions to get the best flavor and texture from rice.
Measure rice and water accurately. The addition of salt and butter is optional.
Use a heavy-bottomed pot when cooking rice so the heat is distributed evenly.
Rice will triple in volume, so use the proper size pot with a tight-fitting lid. If the level of uncooked rice in the pot is more than two-inches deep, choose a pot that will accommodate the amount of rice to be cooked.
Use a tight-fitting lid so the steam will stay in the pot while the rice cooks. Do not remove the lid until the end of cooking time. If rice is not sufficiently done, return cover and continue to cook a few minutes longer.
Time the cooking according to package directions. Cooking at higher altitudes will require additional time and will be indicated in the instructions.
Rice prepared in the microwave takes no less time than cooking on the stovetop.
When used properly, rice cookers or steamers provide a no-risk method of preparing rice. To cook rice in a rice cooker, always be certain to follow the manufacturer's instructions. You may find that you want to reduce the amount of water by 1/4 cup (50 ml) for each 1 cup (250 ml) of rice being cooked.
Fluff cooked rice with a fork before serving. When rice is cooked, stir, recover and set aside for 5 minutes. This allows some of the steam to escape and fluffs the rice to keep the grains separate. (Cooked rice will pack and become a bit sticky if not stirred at this stage.)
Rice may be cooked ahead of time and reheated quickly before serving. To reheat rice, add 1 to 2 tablespoons (15-30 ml) of water for each 1 cup (250 ml) of leftover rice. Cover and heat for 4 to 5 minutes on the stovetop or 5 to 10 minutes in the oven. In the microwave oven, reheat on HIGH for 1 to 3 minutes.
Leftover rice may be frozen in small bags or containers and reheated in the microwave oven or on the stovetop. Remember to add water as recommended above.
When all else fails, follow the instructions...
While exactly how rice cooks vary from variety to variety, getting consistently good results is certainly not impossible and people should not shy away from cooking rice. Just remember...to ensure consistently good results, the best method for preparing rice is generally the one included on the package.
Amuse-bouche is becoming the hottest trend in foods and entertaining. If you enjoy offering your guests interesting fare that always gets raves you should consider learning about the seduction of amuse-bouche.
WHAT IS AMUSE-BOUCHE?
The word amuse-bouche is a French expression, literally translated "mouth-amuser". And no wonder - amuse-bouche are snappy, single bite creations which combine intense taste sensations in an artistic form.
Amuse-bouche is different from your typical hors-d'oeuvres. It is most often offered when guests are seated at the table. Amuse-bouche not only offers guests something to taste while waiting for the dinner but also sets the 'flavor' of the evening. The amuse-bouche should compliment the dinner as well as give guests a sample of the quality of the meal to come.
WHAT CAN I MAKE FOR AMUSE-BOUCHE?
Amuse-bouche concentrates on flavor; often combining simple, intense flavors alongside rich, multi-faceted ones. The focus is on savoring and appreciating the full flavor of a single bite; much as you savor the intensity of a shot rather than having a full cup.
The amuse-bouche can be a combination of bite-size, single ingredient bites arranged artfully on a plate or a combination of flavors offered as one serving on a Chinese spoon. You may also choose a rich, flavorful soup (such as vichyssoise) presented in a shot glass along with a spoon.
The key to a good amuse-bouche is quality ingredients. Whether you're offering simple mandarin slices alongside a savory salmon mousse or a skewered shrimp with a complex marinade, you will want to use the highest quality and most decadent ingredients you can obtain.
PRESENTATION
Second only to quality ingredients and full flavor is a presentation. Amuse-bouche follows the French tradition of artistic presentation. Find amuse-bouche ideas online and take note of the visual presentation. While not complex, the resulting impression is one of style and attention to details. Garnish sparingly and preferably use a simple white plate for optimum presence.
If you are so inclined you may wish to entertain your guests with a variety of amuse-bouche at an evening gathering rather than simply a prelude to a sit-down dinner.
You may also choose to complement your amuse-bouche with a well-chosen wine. Some recipes will indicate a suitable wine or you can base your selection on the dominating flavor of the amuse-bouche.
There are several fine recipe books to guide you as you begin exploring the pleasures of amuse-bouche, but let your creative spirit shine as you take inspiration from the simple pleasures of flavor and entertaining and create your own unique 'mouth-amusers' for your guests.
Lean, juicy beef, mutton, and veal, form the basis of all good soups; therefore it is advisable to procure those pieces which afford the richest succulence, and such as are fresh-killed. Stale meat renders them bad, and fat is not so well adapted for making them. The principal art in composing good rich soup, is so to proportion the several ingredients that the flavour of one shall not predominate over another, and that all the articles of which it is composed, shall form an agreeable whole. To accomplish this, care must be taken that the roots and herbs are perfectly well cleaned, and that the water is proportioned to the quantity of meat and other ingredients.
xxxGenerally a quart of water may be allowed to a pound of meat for soups, and half the quantity for gravies. In making soups or gravies, gentle stewing or simmering is incomparably the best. It may be remarked, however, that a really good soup can never be made but in a well-closed vessel, although, perhaps, greater wholesomeness is obtained by an occasional exposure to the air. Soups will, in general, take from three to six hours doing, and are much better prepared the day before they are wanted. When the soup is cold, the fat may be much more easily and completely removed; and when it is poured off, care must be taken not to disturb the settlings at the bottom of the vessel, which are so fine that they will escape through a sieve. A tamis is the best strainer, and if the soup is strained while it is hot, let the tamis or cloth be previously soaked in cold water.
Clear soups must be perfectly transparent, and thickened soups about the consistence of cream. To thicken and give body to soups and gravies, potato-mucilage, arrow-root, bread-raspings, isinglass, flour and butter, barley, rice, or oatmeal, in a little water rubbed well together, are used. A piece of boiled beef pounded to a pulp, with a bit of butter and flour, and rubbed through a sieve, and gradually incorporated with the soup, will be found an excellent addition. When the soup appears to be too thin or too weak , the cover of the boiler should be taken off, and the contents allowed to boil till some of the watery parts have evaporated; or some of the thickening materials, above mentioned, should be added. When soups and gravies are kept from day to day in hot weather, they should be warmed up every day, and put into fresh scalded pans or tureens, and placed in a cool cellar. In temperate weather, every other day may be sufficient.
Various herbs and vegetables are required for the purpose of making soups and gravies. Of these the principal are, Scotch barley, pearl barley, wheat flour, oatmeal, bread-raspings, pease, beans, rice, vermicelli, macaroni, isinglass, potato-mucilage, mushroom or mushroom ketchup, champignons, parsnips, carrots, beetroot, turnips, garlic, shalots and onions. Sliced onions, fried with butter and flour till they are browned, and then rubbed through a sieve, are excellent to heighten the colour and flavour of brown soups and sauces, and form the basis of many of the fine relishes furnished by the cook. The older and drier the onion, the stronger will be its flavour.
Leeks, cucumber, or burnet vinegar; celery or celery-seed pounded. The latter, though equally strong, does not impart the delicate sweetness of the fresh vegetable; and when used as a substitute, its flavour should be corrected by the addition of a bit of sugar. Cress-seed, parsley, common thyme, lemon thyme, orange thyme, knotted marjoram, sage, mint, winter savoury, and basil. As fresh green basil is seldom to be procured, and its fine flavour is soon lost, the best way of preserving the extract is by pouring wine on the fresh leaves.
For the seasoning of soups, bay-leaves, tomato, tarragon, chervil, burnet, allspice, cinnamon, ginger, nutmeg, clove, mace, black and white pepper, essence of anchovy, lemon-peel, and juice, and Seville orange-juice, are all taken. The latter imparts a finer flavour than the lemon, and the acid is much milder. These materials, with wine, mushroom ketchup, Harvey's sauce, tomato sauce, combined in various proportions, are, with other ingredients, manipulated into an almost endless variety of excellent soups and gravies. Soups, which are intended to constitute the principal part of a meal, certainly ought not to be flavoured like sauces, which are only designed to give a relish to some particular dish.