Apparently, we can see how nature is treated these days. It is a sad thing to know that people do not pay attention so much anymore to environmental problems. What can we do about this? It's as simple as starting with the children. It is good to see the children's involvement with environment-friendly activities. One such nature-loving activity that children could easily get their hands on is gardening. Why should you consider gardening for your children?
Here are the benefits that gardening could easily provide the children with:
1. Science
In planting, children are indirectly taught the wonders of science like the plant's life cycle and how human intervention can break or make the environment. They can have a first-hand experience of the miracle of life through a seed. This would definitely be a new and enjoyable experience for the kids.
2. Life
Watching a seed grow into a tree is just as wondrous as the conception to birth and growth of a child. In time, kids will learn to love their plants and appreciate the life in them. Gardening could actually help simulate how life should be treated -- it should be with care. The necessities to live will be emphasized to kids with the help of gardening - water, sunlight, air, soil. Those necessities could easily correspond to human necessities, i.e., water, shelter, air, food. By simply weeding out, one could educate how bad influences should be avoided to be able to live life smoothly.
3. Relaxation
Studies show that gardening can reduce stress because of its calming effect. This is applicable to any age group. More so, it stimulates all the five senses. Believe it or not, gardening may be used as a therapy for children who have been abused or those who are members of broken homes. It helps build one's self-esteem.
4. Quality Time with the Family
You can forget about your stressful work life for a while be soothed by the lovely ambiance in the garden. You can play and spend quality time with your children. You can talk while watering the plants or you can work quietly beside each other. The bottom line is, always do what you have to do, together with your kids. You might discover a lot of new things about your child while mingling with them in your garden.
Let kids become aware of their environment's needs. And one way to jumpstart that environmental education may be through gardening. It's hitting two birds with one stone -- teach them to respect life while you bond with them.
Dating back to 7000 B. C., zucchini (Cucurbita pepo) is native to Central and South America. Sometimes called by the nickname “Italian Squash,” zucchini was brought to North America by its southern neighbours. Early European explorers introduced zucchini to Italy and other countries in Europe. Italians initially grew zucchini for their sweet, edible blossoms, later the hearty fruits were experimented with producing the delectable dishes that resulted in zucchini being dubbed Italian squash. Up until the 20th Century, most Americans considered zucchini a treat reserved for eating on special occasions and were store-bought instead of grown in gardens.
Part of the summer squash family, zucchini is an excellent source of manganese and vitamin C, a very good source of magnesium, vitamin A, potassium, calcium, iron, folate, copper, riboflavin, niacin, and phosphorous. Many of the nutrients have been shown to be helpful for the prevention of atherosclerosis and diabetic heart disease. Summer squash’s magnesium has been shown to be helpful for reducing the risk of heart attack and stroke. Together with the potassium in summer squash, magnesium is also helpful for reducing high blood pressure. All summer squash are perfect diet foods - low in calories, sodium, fat-free, and provide a source of fibre. All parts of the zucchini are edible.
How To Grow
Zucchini is probably the best known of the summer squashes. It is a type of narrow squash that resembles a cucumber in size and shape. It has a smooth, thin skin that is either yellow or green in colour and can be striped or speckled. Its tender flesh is creamy white in colour and features numerous seeds. Its edible flowers are often used in French and Italian cooking.
Zucchini can be planted by direct seeding or by transplanting young plants that have been started indoors. Seed directly into the ground as soon as the soil reaches temperatures of 60°F/16°C. for vines. Fill the holes with compost and mound slightly. Plant seeds 1in/2.5cm deep.
Zucchini is a member of the Cucurbitaceae family that includes cucumbers, melons, gourds, and squash, all particularly sensitive to frost. Select a sheltered spot, and prepare holes about 12in/30cm in diameter and 12in/30cm deep. Measuring from the centre, space the holes 36in/90cm apart for bush types, 6ft/1.8m apart for vines. To conserve space, squash can be trained over a sturdy trellis, in which case 2ft/60cm between plants is enough.
Zucchini grows best when exposed to 6-8 hours of direct sunlight each day. Regular watering is essential for summer squash. Feed the plants with a high-potassium organic liquid feed to produce a higher yield. Thick mulch added after planting will preserve moisture and keep the fruits from touching the ground where they will become soiled and be exposed to insects and diseases.
Harvesting
The flavour of zucchini is best when it is less than six inches long. They should be firm, but not hard. Zucchini are prolific producers and regular harvesting will promote continued yield throughout the growing season. Harvest by cutting the stems from the plants gently with a paring knife. As they are composed mainly of water, summer squashes dehydrate rapidly. Harvest just before cooking and keep in the refrigerator in a perforated plastic bag until cooking. Don’t forget that squash blossoms are delicious to eat.
Small summer squashes are used skin and all. Larger squash needs their skin and seeds removed: slice lengthwise and scoop out the seeds with a spoon. Wash summer squash under cool running water and then cut off both ends. You can then proceed to cut it into the desired size and shape for the particular recipe.
In the kitchen, zucchini can be steamed, sautéed, boiled, baked, fried, grilled, and stuffed. Some ideas include: serve raw as an appetiser with a vegetable dip or salad dressing, grate and sauté with thinly sliced garlic, add to bread, muffins, cakes, stews, casseroles, soups, sprinkle grated zucchini or other summer squash on salads or sandwiches. It can be preserved by canning, freezing, and drying.
In the garden, some gardeners let the squashes ramble through the corn patch, where their sandpapery leaves deter raccoons. Good companion plants for zucchini are corn, marjoram, and nasturtium. Don’t grow zucchini and Irish potatoes together as they are incompatible.
Weeds whether pretty attractive or downright ugly can be a pain in the neck. They can grow in your garden, walkways, sidewalks, and even up the side of your home if not properly removed. If you are looking for safe do it yourself solutions on how to rid yourself of weeds, you have come to the right place. Below are a few common and uncommon ways for which you can kiss those weeds goodbye.
Baking Soda
If you’re looking for a great way to keep the weeds at bay you can easily sprinkle a handful of baking soda onto the concrete areas in your yard which can include the driveways, patios, and walkways. The sodium makes it a less friendly environment for troublesome weeds like dandelions.
Bleach
Another option for getting rid of weeds found on concrete is to pour a bit of undiluted bleach over the concrete. Let the bleach sit for about a day or so and then proceed to remove them. They should remove much easier and the bleach prevents it from returning so soon.
Carpet Scraps
Did you know that a few pieces of carpet scraps turned upside down can keep your garden free from weeds? Place the carpet upside down and cover it with mulch.
Plastic Shower Curtains
Another great way to keep the weeds at bay in your garden is to utilize a shower curtain. When doing landscaping that involves gravel or bark chips all you have to do is place the shower curtain underneath the mulching materials. This prevents the weeds from poking through.
Vinegar
Another great solution for troublesome weeds poking through your driveway or patio is to try some vinegar. Using a plastic spray bottle you can easily rid yourself of weeds by spraying some full-strength apple cider or white vinegar. Early in your gardening season gently spritz your plant in the middle of the flower before the plants go to seed. Spraying more around the stem near the ground will allow the vinegar to also soak into the roots. However, this should be done on a day where there won’t be any rain for a few days after. If it does rain you will need to re-spray the plants again.
Vodka
You probably wouldn’t have thought to look to your liquor cabinet for a safe remedy to get rid of weeds but vodka can work wonders. All you need to do is mix about one ounce of vodka with a few drops of liquid dish soap, about two cups of water into a plastic spray bottle. Generously spray it on the leaves of the weeds until the solution is dripping off. By also applying it to the weeds on a sunny day is a great way to help the alcohol break down the wax barrier found on leaves. This allows the leaves to become hydrated and thus will kill the weeds.
Last but not least on the list of easy remedies to try for getting rid of weeds is WD-40. This is great for prickly weeds such as the Russian Thistle. WD-40 will speed up the withering process and cause them to die.
Many times we buy plants on impulse then find there is nowhere in the garden that really suits them. Before buying plants carefully examine your garden to see how much sun and shade it gets, whether the soil is well drained or waterlogged and whether your aspect is sheltered or windswept. You'll then be equipped to go and buy the best plants for your situation; shade-loving plants for the sheltered areas, sun-lovers for the warm spots, drought-resistant plants for the parched areas which may be either sunny or shaded, and swamp plants for the poorly-drained parts.
But wait! Test your soil first, to determine the pH level of your soil and what kind of nutrients you need to add if any. Is the soil acid or alkaline? Most plants prefer soil that is slightly acidic, but there are some that must have alkaline soil to grow. You can alter the soil's pH level, but it's much easier to simply plant for the soil you have.
Now you are ready to plant. Well - almost. Will you plant in groups or singly? If you buy 'one of everything' your garden may seem rather spotty. Group plantings are organized, harmonious and you can vary the color for interest.
Before planting out, place your chosen plants around the garden bed in their pots to see how they will look. Re-arrange them until you are satisfied. Grouping plants in sets of threes or fives usually looks better than planting in groups of even numbers. Be sure that you have an interesting combination of colors and textures of plants. Tall plants should go to the back, or the center if your garden will be viewed equally from all sides. Try to keep your plants away from trees. The roots of trees are fiercely competitive and will steal all the nutrients and moisture meant for your flowers.
The right color scheme is one way to maintain harmony in your garden. Imagine the color of the flowers when they are in bloom. Some colors may clash with others, but can still be planted side-by-side if they have a different blooming season. Foliage color is also important. Many flower plants have silver, grey or purplish foliage that is just as attractive as the flower. This means that they are still attractive well past the blooming season and so have added value.
One of the more popular equipments people use for keeping up with the care of their property are petrol lawnmowers. There are several kinds of lawn mowers that people can choose from, such as an electric lawn mower or push mower. Others are powered by petrol or gasoline and for those with the most expansive lawns, there are ride-on lawnmowers.
The Problems with Electric Lawn Mowers
These come in two forms, one with a cord and one that is cordless. Corded versions might not be feasible for people with a medium or large-sized lawn because of the limited range that the cord will extend: usually around 100 to 150 feet. Some people consider electric mowers with a cord to be a hazard because of the risk of possibly running over the electric cord while the mower is running, which could put the user at risk of being electrocuted. The cordless electric lawn mower doesn't suffer from this issue. Instead, it runs on 12-volt batteries that can be recharged via a conventional household plug socket. If the keen lawn-smith goes with an electric lawnmower, a cordless one would be a serious option to consider if they were concerned by the potential hazards and limitations that come with a corded lawnmower.
Push Mowers Only for the Fit and Healthy
Push mowers are also common, requiring only man's power as the power source. By pushing the lawnmower, the blades turn as the wheels turn, cutting the grass or weeds. However, push mowers aren't as effective on overgrown weeds and dandelions because of the tall stalks and the speed of the rotating blades. Push mowers use a cylinder or reel system while other powered lawn mowers more commonly use a rotary mower with a vertical axis. A rotary mower cuts the grass shorter than a reel system with the added benefit that the grass is cut in a way that allows it to heal faster and thus, grow faster. With a push mower, the user would find himself or herself having to mow more frequently than with an electric or gasoline-powered mower which is perfect for those looking for a workout but less so for the rest of us!
Ride-on Mowers for Large Lawns
Ride-one can be fun for some people who have a bigger area to mow. Surprisingly, they carry a potential risk for the homeowners who have lawns that have some dips or others who have rolling lawns. Ride-on lawnmowers can tip over if they are on very uneven ground and can't go places where other lawnmowers might into the much tighter parts and close up to in-lawn obstacles such as shrubs and around the base of trees requiring additional work. They are, however, invaluable for cutting large areas of flatter lawn in the lowest possible time.
The Pros and Cons
Petrol power is one of the more common types of mowers. They can be noisy but are very effective and can get to places where a ride-on lawnmower or lawn tractor wouldn't be able to reach as previously discussed. If part of the lawn is downhill and the ground isn't even, that wouldn't be much trouble with a petrol lawnmower because, with the user's help, the mower can get to grass in a dip. Some powered lawn mowers come with throttle control, taking off some of the strain on the user's pushing ability. To work the throttle control on these self-propelled mowers, the user only needs to either press down on the throttle or ease up to either increase or decrease the speed of the mower and this throttle control allows the user to mow his or her lawn easily, almost like a ride-on except with more accessibility.
Owners of a petrol-powered mower also don't have to worry about running over a cord by accident and reduces the risk of other garden lovers tripping over the cord. Users with electrics that run on battery power eventually run out of power and need to be recharged which could take several hours. Imagine this: A beautiful, sunny day with a weather forecast that says the rest of the week will be rainy. It's time to mow the lawn but wait, whoever mowed the lawn last time realized the battery had run out and forgot to recharge it. Recharging a 12-volt battery takes a bit of time as opposed to just pulling the starter cord of your powered mower. If the petrol runs out, all one needs to do is make a quick trip to the fuel station to get a refill and the blades of grass can once more quiver in fear.
Just like any mower, there also are downsides to petrol-powered lawnmowers. Noise is one of those downsides, with many places, specifically in the US and parts of Europe, having a noise ordinance which means that they cannot be fired up outside specific times of the day. It also might be a disturbance to nearby neighbors who don't appreciate the noise of a petrol engine in addition to the usual mower sounds. Another potential downside to petrol-powered lawn mowers is the fuel. With petrol prices on the rise, people are trying to avoid using too much petrol and are often aiming to reduce their fuel intake. Depending on the lawn size and type of mower, the average tank may get 3 to 4 mowed lawns before needing more fuel.
Summary
Petrol lawnmowers are efficient and one of the most flexible mowers to choose from. The gardener can choose whether they want a rotary blade or a cylinder or reel blade and they won't have to worry about the distance they can go, whether extension cords might be required in order to mow the entire lawn or whether they are going to run over the trailing cable. The efficiency of time and fuel or key when looking at total cost of ownership and petrol lawnmowers can pay both of these back in spades.
With so many sources for live plants In the market these days, you might start wondering why some people would even bother growing his plant from a seed. This has got its own point but nothing still beats the satisfaction in growing something from its basic form- in this case, a plant from a single seed.
Self-satisfaction is one main reason why people still opt for wildflower seeds while there are so literally hundreds of other easier ways to put up a wildflower garden. The wildflowers from mail orders and garden centers are really great but these would never duplicate the satisfaction of the gardener if he knows that he accomplished one of the most vital happenings in the world- the growth of a plant.
Another reason is the money value. Seeds are far cheaper since there is not much investment on the part of the seller. Aside from this, the cost of shipping, storage, and handling costs and other extra payments will be eliminated since a) seeds require minimum space for strange and handling and b) wildflower plants are more difficult to transport due to bulk and care that must be dedicated for each plant.
The third reason why there is wisdom in buying wildflower seeds than choosing to more mature wildflower plants is the variety of choices. The diversity of wildflower plants in gardening centers could never equal the variety that could be offered if they were stacked in small packages.
So, if you are thinking of growing your own little garden of wildflowers, you might consider investing in wildflower seeds than live plants.
If you would give it a try, then you should know some of the basic knowledge in growing wildflower seeds. Fractions of this are the following:
Check for instructions- Before you begin with experimenting with your wildflower seeds, it is best that you check the instructions that come in the packages. This way, you will better identify which wildflower seeds must be soaked in water first, or which should be frozen first or which should undergo other sorts of treatments before beginning to scatter them in the soil. Also, carefully following the seller's instructions would also serve as your easiest way out of potential risks.
Gather all the materials needed- If the carpenters have their hammer, screwdriver, and stuffs that they would build things with, gardeners also need to have some specialized items that would help you grow your wildflower seeds into lovely flowers and plants. These include seed pots and trays, seed tray covers, potting compost, and other more common gardening tools.
Know the process by which your wildflower seeds would spring into its lovelier and more attractive forms- Like all living things in this sphere, wildflower seeds also have their lifecycle that has some basic succession like all other plants and some more species-specific processes that they undergo. To effectively grow wildflower seeds into their best shape, you have to know these processes and understand the principle behind.
If you are an experienced gardener, this really is no big deal for you as you have already seen the life that these creatures possess. But if wildflower seeds are your trial stage, you might want to do some researches to help spare you from beginner's failures.
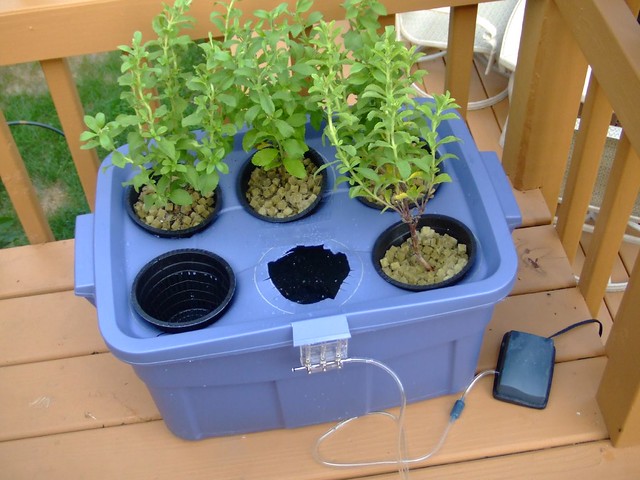
Hydroponic gardening is the way of the future for environmentally controlled agriculture.
Hydroponic gardening eliminates soil-borne pests and diseases and maximizes water and nutrient uptake by the plant. Incredible yields can be achieved in a relatively small space with hydroponic systems. There are many types of hydroponic systems available for home and commercial use.
These systems include the Europonic Rockwool System, the Ebb and Flow System, Aeroponic Systems, Continuous Drip Systems, and Rock wool Based Systems. Hydroponic systems come in all shapes and sizes and can be adapted for nearly any budget.
Nutrient Film Technique, or NFT, is another popular system. The plants are held in troughs with nutrient solution constantly trickling over the roots. A reservoir with a pump that is submersible re-circulates the nutrient solution continually, pumping the solution to the top of the troughs to trickle back through the system. Larger Nutrient Film Technique systems are used commercially, both abroad and in the United States. When choosing a Nutrient Film Technique system, care must be taken to choose the correct trough size.
Large commercial systems use wider troughs with greater flow capacity. Aeroponics is a system in which the plant’s roots are suspended in the air. They are excellent for growing herbs and leafy vegetables. The plants are held in web pots with neoprene inserts to support the plant. Different hold configurations in the top cover provide the proper spacing. Aeroponic systems are also great propagators. The seedlings can be germinated in Rockwool then transferred directly to the web pots.
The Europonic System is modelled after commercial systems that are used in Europe. A basic system has three trays and holds eight plants each. The system may also be expanded to five trays if desired. A nutrient solution is pumped from a thirty-gallon reservoir to individual emitters at each plant. The solution trickles through the rock wool, over the roots, and back to the reservoir where it is re-circulated on a constant basis. Rock wool, or mineral wool, is the most popular and highly used hydroponic medium. It is made from spun material fibres and has a high water and air holding capacity.
The Europonic System uses rock wool slabs with two slabs fitting into each tray. Rock wool is easily able to support a relatively extensive root system so the Europonic System is ideal for vine crops such as tomatoes, cucumber, and peppers, plus large flowering plants.
In a continuous drip system, a single pot is used with a two-gallon reservoir underneath. The system acts like a percolator as air is pumped down a vertical shaft, creating pressure, and nutrient solution is forced up another tube. A drip ring constantly irrigates the substrate, and the nutrient solution drains back into the reservoir. This type of system is easy to use, inexpensive, and great for individual experimentation. However, it is impractical for most commercial applications. Ebb and flow systems are also popular in hydroponics. They are good for crops such as lettuce, pepper plants, miniature tomatoes, and potted flowers.
As the water evaporates between flooding, the salts are left behind as a residue and may rise to toxic levels. It is best to flush the system with pure water periodically to take away any toxic salt buildup.
Ah, it is summertime and you want to take up planting and gardening as a hobby. Who can blame you! It is a relaxing, fun, and rewarding hobby. If you are trying to plant tomatoes, and you have no clue how it works, read on. I am a total newbie to green thumbing my way through life.
First, you have to “Make sure you buy healthy tomato plants so you will be getting more tomatoes from your plants. If the plant is not sturdy to start with, Miracle grows can give it a boost. Follow the directions on the container, so you give it the correct nutrients. Keep feeding your plants tomato Miracle grow plant food as directed.” Okay, so we have got this down. We need to make sure the plants are healthy. Check!
Next, let the digging begin. Say what! I said start digging, “dig a hole that will cover at least 2 swirls of the plant. Yes, that is right! You will be burying some of the tomato plant branches to get more tomatoes from them. This idea gives the plant a better root system.” Alright, so we dig to keep the plant firmly rooted in the ground. The deeper the hole, the better off we are.
As the plant grows, you need to watch out for the branches. “As the tomato plants grow, take off a few of the branches that do not have buds or flowers on them. Again you are giving your tomato more nutrients to fewer stems and you will get more tomatoes from these plants by snipping one or two every now and again throughout the growing season of your tomato plant.” Remember, we are taking off the branches, not just the leaves. You want to get rid of any excess branches that are not blossoming.
Then, we need to talk about watering the plant. “Water every day by moistening the ground and not wetting the plant. The leaves can be parched by the sun if you let them get wet from watering. A tomato needs frequent watering to produce more tomatoes. “
Here’s an old trick that e-How shares with us, “An added idea is to place an old tire around the plants. Fill the tire rim with water. This creates a warm water mist to your tomato plants as the sun hits the rubber. You will get more tomatoes from your plants if you place the tire after you plant them in your garden.”
Alright, let us summarize the steps: make sure the plants are healthy. If they are not healthy, make them healthy with some Miracle Grow. Then, make sure they are rooted, supported, and watered!
No dig new bit of garden with newly planted Artichokes - Flickr
The idea of no-dig gardening was developed by an Australian named Esther Deans. It was originally both developed both as a labor-saving idea and a method to rejuvenate badly depleted soil in a vegetable garden.
The process involves starting with layers of newspaper, and by adding lucerne hay, straw and compost in succeeding layers, you can create a growing medium without resorting to heavy digging, and one that is rich in nutrients and which will simplify weeding and encourage your much-desired plants to grow. The layers compost together, and greatly encourage earthworms. The gardens are maintained by adding manure, compost, etc., and should not be dug up, as this will undo the good work. I have used this approach to creating vegetable gardens, and it certainly does work.
The principle of not digging has sound foundations. Excessive cultivation of the soil, especially when very wet or very dry, will damage the structure of the soil, and lead to compaction. Such excessive cultivation can also discourage the earthworms, and they are the best free labor a gardener has.
Some followers of permaculture and organic gardening have translated no-dig into never-dig, which I believe is sadly mistaken. If you start with a base soil that is badly compacted, then your no-dig garden will initially work well, but you may find your garden does not continue to perform well. The fertile layer you have built up will encourage the earthworms, but we do know that the worms need to shelter from excessively hot, dry, cold, or wet conditions. They have been found to seek shelter from extreme conditions by burrowing more deeply into the soil, sometimes many feet down. If they cannot shelter in this way, it is my contention that they will die out or move out.
My belief is that initial cultivation of the soil before you apply the no-dig system will guarantee a better environment for the worms, and thus a better garden for growing your plants, over the longer term.
By all means, give the no-dig approach a try – you will be pleased with the result.
Garden with some tulips and narcissus (Photo credit: Wikipedia)
Many amateur gardeners see the winter as a time to take respite from their garden, away from the cold and wet weather that freezes our hands and damages our plants. After all, what is the point in spending our time and efforts in the garden if Jack Frost is going to take it all away in one harsh, cold night?
In actuality, gardening in winter is crucial if you want to keep your garden healthy throughout the year. Protecting plants from the frost, harvesting winter produce and pruning dormant trees are all essential jobs to make the transition to spring and summer all that easier.
As well as conducting essential maintenance, winter is the perfect time to take a look at your garden landscape and plan any changes for the upcoming year. Do you need to rotate your crops? Perhaps your land is looking a bit barren, maybe some more evergreens would benefit for the following year? What seeds should you be ordering in?
If you've been gardening for a few years, answering these questions come as second nature, making annual gardening almost instinctual. For those just starting to try their hands manipulating nature, here are some tips to help you prepare your garden for the following year.
Wysteria and fruit trees such as apples and pears should be pruned now while they're still dormant, as leaving them too late will lead to sap bleeding and can hinder growth.
Hardy evergreen hedges can be pruned now to encourage spring growth, whilst conservatory climbers can be pruned to prevent birds from nesting. Roses and any plants showing signs of damage from frost should also be cut back to encourage new healthy shoots.
Digging over the soil with manure, fertilizer or compost is a great way of preparing the ground for spring planters, and will also turn up any weeds and pests which can damage your new plants. Once the soil has been dug over, mulch lightly to keep in nutrients and moisture until the weather has warmed up for planting.
Once the ground reaches 6 degrees C, you can encourage spring seedlings by warming the ground with cloche and planting, although make sure you protect them from cold nights with frost fleece.
If your worried plants won't make it this early, start them indoors and gradually bring them outside for one day, then two days, and so on - this allows them to get used to the sun and rain whilst still growing strong from the warmer indoor weathers.
By Anna B C
For more tips, make sure you check out the Hartley-Botanic blog as they provide monthly gardening guides that highlight what to do in the garden each month.
Photograph of tomatoes on a vegetable stall at Borough Market in London, UK (Photo credit: Wikipedia)
Native to the Andean region of South American and under cultivation in Peru in the sixteenth century, tomatoes (Lycopersicum esculentum) have been grown for thousands of years. The Spanish introduced them to the European cultures. Europeans were not open to trying tomatoes until the end of the sixteenth century, as tomatoes, being part of the nightshade family, were considered poisonous. Later, the French tried them and began to call them “pommes d’amour”, apples of love. They felt that tomatoes carried aphrodisiac qualities. It wasn’t until the 1900s when the tomato gained popularity in North America.
Scientific research shows the health benefits of this tasty fruit. In recent years, researchers discovered that tomatoes were natural sources of the element lycopene. This antioxidant has been shown in tests to dramatically reduce the risk of cardiovascular disease and many cancers, including prostate and colon cancers. Tomatoes are an excellent source of phytochemicals, nutrients, fiber, and contain practically no fat or sodium. They are significant sources of vitamins A, B, and C and a source of iron and potassium. In fact, one medium-sized tomato provides 20 percent of the daily-recommended value of vitamin A and 40 percent of the daily-recommended value of vitamin C.
How To Grow
Tomatoes are very easy to grow from seed. In all, there are more than 100 types of tomatoes to choose from. Though most people believe ripe tomatoes are red, they actually come in many colors, including green, yellow, purple -- even striped. Unless you grow your own, you will not have the opportunity to experience the many varieties. If you don’t have the time, buy tomato plants from garden centers. Look for different varieties as they are becoming more readily available from growers.
Six to eight weeks before transplanting, start tomato seeds by filling a seedling flat with a good quality seedling mixture. Use excellent quality potting soil from the garden center to make sure the soil is sterilized and has a high percentage of sphagnum peat moss and perlite. Don’t use garden soil, as it tends to become hard and inhibits proper rooting of seedlings, and it may contain insects, disease, weed seeds, or chemical residue.
Sow seeds no deeper than the thickness of the seed: sprinkle the seeds onto the soil-filled flat and press them down gently. Cover the seeds with a thin layer of fine, horticultural-grade vermiculite to prevent drying. Water just enough to moisten the soil with a fine mist spray such as the sprayer on the kitchen sink or a mister bottle. Keep the seeds evenly moist to ensure the mixture never dries out as both germinating seeds and seedlings are very intolerant of dry soil and will die if they are dry for even a short time. Cover the flat or pot with plastic wrap or a clear plastic bag. Remove the plastic as soon as seedlings emerge.
Tag each container with the date planted and the tomato variety. To promote rapid germination, place the flat on a heated table, top of the refrigerator, or a heat register. Once they germinate and seedlings begin to appear, move them from the heat source into a location with lots of light. They need very high light levels to grow properly: a south-facing window without blinds or curtains is ideal. Use grow lights to enhance growth. Hang the lights 6 inches (15 cm) from plants and leave lights on for 14 hours a day.
Transplant the seedlings into larger, individual containers once the first ‘true’ leaves appear. After transplanting, fertilize once a week with a plant-starter fertilizer such as 10-52-10 at ¼ strength. As an organic gardener, I do not use commercial fertilizer, only fish fertilizer on my transplants. They are strong, healthy plants and are fed weekly until moved outdoors. Harden-off and plant them very deeply where the stems will develop roots helping the plant become established.
Tomatoes are heavy feeders and need ample quantities of compost or decomposed manure. Mulch and water in dry weather to maintain soil moisture and stave off wilt disease and blossom-end rot. Blossom-end rot is caused by water stress or calcium deficiency. Watering regularly and evenly is the key to preventing blossom-end rot. Never water tomatoes from the top. Water tomatoes from below and water deeply.
In the garden, tomatoes are compatible with chives, onion, parsley, marigold, nasturtium, and carrot. Tomatoes and all members of the Brassica family repel each other and should be kept apart. Plant garlic between tomato plants to protect them from red spider mites. Tomatoes will protect roses against black spot. To make a spray for roses, place tomato leaves in your vegetable juicer, add 4 or 5 pints of water and 1 tablespoon of cornstarch. Strain and spray on roses when it is not convenient to plant tomatoes as companions. Label and keep any unused spray in the refrigerator.
In the kitchen, tomatoes can be used for salads, soups, juices, sauces, stews, baked dishes, sandwiches, stuffed, grilled, broiled, pasta dishes, and salsa. They combine well with meat, fish, poultry, pasta, rice, as well as other vegetables. Store tomatoes at room temperature. To ripen green tomatoes, place in a brown paper bag with an apple at room temperature for several days. If fresh tomatoes aren’t available, use canned tomatoes or canned tomato juice, which are fine substitutes.
This is a picture of hands sifting through potting soil in a garden bed. (Photo credit: Wikipedia)
If you’re a new gardener the very sight of warm spring weather makes you think about planting. The onset of warmer temperatures is nature’s way of saying that the winter frost has passed and the gardening season is well on its way. While your seeds will need to be prepped in different ways, there are some basics you can do such as prepping the soil so that you’re ready once planting season begins.
Let’s Get Physical
It is important to point out that there is going to be quite a bit of physical work involved, however, it is very self-explanatory and can be done with ease. The process is a simple step by step and does not all have to be done at once. So for those who have a larger garden area, prepping your soil in parts is okay so that you don’t stress yourself out physically.
Start Date
Don’t let the warm weather full you. Simply because the temperatures have changed does not mean it is the best time to begin working on your soil. Prematurely digging into wet soil can damage the structure and cause long term damage to your crops. A great way to test the moisture levels in your soil is to take a handful of it and drop it to the ground while holding it approximately at waist height. If the soil does not break apart that means that it is not ready to work with.
Making Room
If your soil is dry enough to work with than you can begin garden bed preparations by getting rid of all the surface vegetations. This means removing any unwanted weeds or dead crops from the ground.
Fixing the Soil
Once you have your garden bed all cleared out it is time to add any amendments to the soil that you may need. Some prefer to add in a few inches of compost as well as fertilizers to enhance the quality of the soil. If you can, you should also check the PH balance of your soil to see if you need to add either limestone to acidic soil or pipe sawdust for soils that are alkaline. This can be done by scattering either limestone or pipe sawdust around the soil and then incorporating it in. When soil is in good shape you only have to dig a few inches utilizing a fork, however, for compacted soil it may take more time to dig so that you can get the ingredients mixed into the soil.
After you have completed adding the amendments to the soil to improve its overall structure and quality you are now ready for the final step. You will need to break apart all of the large solid clumps of soil you might find laying around. This can be done with a fork easily. Then after breaking up the clumps, you should shape the bed using a rake. After your garden bed has been shaped properly you are ready to begin sowing or planting once your garden season officially arrives.
Homeowners are encouraged to test their soils for nutrient needs and to apply only what nutrients are needed for a healthy lawn. Farmers practice the same testing procedure. (Photo credit: Wikipedia)
If you’re going to start a garden one of the most important things to consider is the structure of the soil. Not all plant life will grow in all soil conditions and therefore before you waste your seeds, it is best to know what type of soil you are dealing with and how you can go about improving it so that it can properly nourish the plants you wish to grow.
Soil Tests
In order to achieve high-quality plant growth, the soil has to have decent pH levels. PH levels are measured on a scale of 1 to 14 with 7 being neutral. Soil that is rated below a 7 is acidic (also known as sour), whereas soil rated higher than a 7 is alkaline (also known as sweet). These numbers are needed to determine how well the plant will draw nutrients from the soil.
By taking a soil test you can easily find out if your soil is neutral, acidic, or alkaline and make the proper adjustments according to the types of plants you wish to grow. In any case, most plants can withstand the neutral soil conditions with a rating of anywhere from 5.2 to 7.2. If your soil is too acidic or alkaline you will need to add either lime or sulfur.
You can easily find a soil testing kit by visiting a home improvement store. The kits will provide you with instant analysis of the type of soil you have, its pH levels, and the nutrient levels. If you don’t want to test it yourself you can also check local laboratories that can test the soil for you. Results will not happen instantly and take a few weeks to return. However, some new gardeners prefer going to a lab because they also receive advice on how to amend the soil to better conditions.
Steps to Home Testing Your Soil
If you’ve purchased a home soil testing kit you will see that it includes some vials and tablets for you to test the soil. There are charts available to help you interpret the results with ease. Be sure to carefully follow all the instructions on the kit for the best results. All you need to do is stick the meter probe into the soil and review the chart for your results.
Steps to Lab Testing Your Soil
If you are going to send your soil samples off for analysis by a laboratory you are going to need to have a garden trowel, a clean bucket, and a clean plastic container. Next, you will need to sterilize and thoroughly clean the tools you will be using to collect the sample. Then in the area, you intend to plant in dig up five holes that measure about six to eight inches deep.
Remove a ½ inch slice along the side of a hole and put it into the bucket repeating this process for all five of the holes. Mix all the soil into a bucket and then spread it onto a newspaper to fully dry out. Collect a least a pint for a significant sample.
Old Man Winters' arrival doesn't mean that the Winter garden can be neglected. Keeping the garden on an even footing against the ravages that winter can bring is ongoing. Neglecting proper garden closing chores and winter maintenance tasks is only a recipe for a headache in the spring. Follow a few of these winter garden tips and a bountiful spring will be waiting in a few months time.
Setting the winter garden table
An interesting to look at and healthy winter garden depends upon taking steps in the late fall or early winter. Clean up the garden. Make sure that any garden trash is picked up before the snow flies. If this "trash" is left behind it presents an opportunity for bacteria to find its way into any cuts in the plant or onto the plants' roots. Bacteria growth, and possible disease, on the plant, is the biggest danger to a winter garden.
Watch out for color when trimming
If you have had your garden for at least one winter season you know what has color during winter and what does not. Trim this color judiciously looking for maverick branches, but be sure to keep the overall form of the shrub so that winter color can shine in a uniform way. If you are not sure, leave it alone and get a feel for what has winter color for next winter. If a shrub has a winter bud on it, leave it be as this is where the flower will come from next spring.
Trim out the cut or torn limbs
Chances are that a torn or cut (looks like a knife cutting into an apple about an eighth of an inch deep) limb will end up dangling, or on the ground, as winter progresses. Take care of it early and your garden will look sturdy and ready for whatever the winter has to offer. Look for a nodule on the limb (looks like a knuckle of sorts) and cut about one-quarter of an inch above it on an angle for a proper cut.
Weed to a clean ground
Weeds also present a messy problem through the winter. Not only will they decay and offer disease potential, but they will also continue to grow their roots until the ground freezes hard. This will only make them more invasive in the spring. Besides, if you need to a clean ground you will have a nice clean contrast to the dormant plants in the garden.
A nice clean edge
Unless you are going for a more informal look, give a nice edge job to your garden flower beds before the ground freezes. Not only will this make for a crisp look during the winter months, as the edge freezes, but it will put you one step closer to a solid start in spring.
To wrap or not to wrap
If you look at many winter gardens you may notice that people have wrapped burlap or some other material around their evergreen shrubs. Generally, this is to prevent a snow load or high wind from damaging the plant. Unless you have the potential for a snow load or predictable high winds this is not necessarily needed. The wind issue is an issue, but remember that all plants need air circulation, no matter what type of plant they may be. If you wrap a shrub/plant to tightly air circulation will diminish and present the opportunity for moisture build up and disease. If you wrap your shrubs make sure to do it securely but with air circulation in mind.
It cannot hurt to the mound
Mounding around the base of a plant is intended to give the root systems of a shrub/plant a little extra insulation during hard winters. Depending upon which zone you happen to be gardening in the need for mounding rises and falls. In any case, you want to make sure that you compress the dirt of the mound with a firm push of the hands. This gets some of the air out of the mound and generally makes a mound of dirt look a bit nicer. It also shows that you took a little care in your gardening. This sometimes impresses people that visit your winter garden.
Trees are plants too
Take a few moments to assess your trees before the winter winds start to howl. Look for any branches that may have grown old, look to be growing across the desired vertical path of a properly trimmed tree or have died during the season. What you are looking for is any limb or branch that may rub constantly on another opening a wound in the bark. Generally, you would not want to cut a branch as winter approaches, or during the winter months, but sometimes you need to.
Most composting is done in the spring and summer months. The reason is that heat is such an important element to the process. Even though the composting process itself generates heat, the warmth from the weather certainly helps everything along.
Most composts go dormant in the winter months and start up again with the spring thaw and warmer temperatures. But if you live in a milder climate that does not get harsh winters, there is a way to continue to compost during the winter months.
You can create an insulated compost bin. Using a plastic garbage can dig a hole big and deep enough to put at least six inches of the can underground. Use a natural insulating material such as straw and pack it around the base and up the sides of the can. Continue to compost as you would at any other time of the year.
Even though this method will still work in the winter months, the speed at which the material will decompose will still be slowed down. Winter composting will allow you to continue recycling your kitchen scraps throughout the colder months and you may even have compost at the beginning of spring to use in your garden.
The spring and fall are the best times to collect leaves to start a new compost bin. In the spring, the leaves you collect have already started to decompose as they stayed wet and insulated throughout the winter. It doesn’t matter though if you collect your leaves in either season – they are the perfect base for a new compost pile. If you are using dry leaves from the fall, consider putting them through a chipper of some kind. If they are smaller and already cut up it will aid in the whole composting system.
There are part-time indoor gardeners; these are the ones that live in an area with cold winters – too cold for their outdoor plants to survive in. By transplanting or bringing the plants indoors, they can survive the colder months and add greenery inside the home. There are some considerations and preparations that should be made before you decide to become a part-time indoor gardener.
The most important point to think about before bringing a plant indoors is whether or not it will survive to be an inside plant. If the plant has high or very high light requirements and your house does not get a lot of light in the winter time – it may not be a good solution. As a back-up, you can invest in an artificial light source to supplement the natural light the plant will get.
How will you get the plant indoors? If the plant is already in a pot that will fit inside it is easy enough to move it indoors. But if the plant is in the ground you need to find a pot large enough to contain the root system and one that will not be too difficult to move. Keeping in mind that when a large plant is transplanted (re-potted or put in a pot for the first time) it may go into shock. Although with careful attention, you can nurse your plant through this.
Most likely you have been taking care of your plants outdoors and they do not have any pests or bugs on them. But it smart to double-check. By bringing an infested plant indoors you are putting all of your other indoor plants at risk of becoming infected too. Either forego bringing the plant inside or treat the pest problem before the cold weather arrives. You may enjoy having your plant inside all winter that you decide to keep it there come springtime.


 . This is great for prickly weeds such as the Russian Thistle. WD-40 will speed up the withering process and cause them to die.

 of your soil and what kind of nutrients you need to add if any. Is the soil acid or alkaline? Most plants prefer soil that is slightly acidic, but there are some that must have alkaline soil to grow. You can alter the soil's pH level, but it's much easier to simply plant for the soil you have.
 . Foliage color is also important. Many flower plants have silver, grey or purplish foliage that is just as attractive as the flower. This means that they are still attractive well past the blooming season and so have added value.


 , it is best that you check the instructions that come in the packages. This way, you will better identify which wildflower seeds must be soaked in water first, or which should be frozen first or which should undergo other sorts of treatments before beginning to scatter them in the soil. Also, carefully following the seller's instructions would also serve as your easiest way out of potential risks.
 , this really is no big deal for you as you have already seen the life that these creatures possess. But if wildflower seeds are your trial stage, you might want to do some researches to help spare you from beginner's failures.