Steak Diane is a classic and tasty meat dish that is a classic in white-tablecloth restaurants and, to properly be served, must be prepared at tableside. This presentation is a great way to impress your guests or perfect for that special romantic dinner!
Heat oil in a large pan over medium heat until hot. Add mushrooms and shallots; cook and stir for 4 minutes or until tender. Remove.
On a clean pan; spray with cooking spray or few drops of oil, heat over medium heat until hot. Combine lemon peel and pepper; press onto beef steaks. Place steaks in pan; cook 12 to 15 minutes for medium rare to medium, turning occasionally. Remove and keep warm.
Adding the brandy to the pan, cook and stir until browned bits attached to skillet are dissolved. Stir in half-and-half, lemon juice, mustard and Worcestershire sauce. Stir in mushroom mixture; heat through. Serve with sauce. Serves 4.
Should I use a special Bonsai soil or just normal soil?
The increased popularity of growing Bonsai trees and plants has brought with it many more specialist shops; the Internet being virtually awash with Bonsai supplies. As a beginner, it is usual for people to go out and buy everything they think they could possibly want to ever grow a Bonsai. However, there is a good chance you may not need it. You can buy Bonsai soil at very reasonable prices now, and this soil is mixed to a perfect combination of nutrients, soil and grit that will help your Bonsai grow, but many practitioners of the ancient art of Bonsai would probably consider this cheating.
As a beginner, it is important that you do what you can to make your first Bonsai as successful as possible. Many people will throw in the towel after just one failure, and when you consider how long a Bonsai can take to reach maturity this really isn’t an overnight hobby. You must get into a regime of regular watering, annual potting and plenty of care and attention in order to be able to enjoy a beautiful Bonsai for your troubles.
Is Bonsai soil expensive?
Bonsai soil shouldn’t be costing you very much more than normal potting compost or bags of nutrient-rich soil that you use in your garden. A good Bonsai soil, however, may contain a long list of ingredients including clay, soil and even bark. Some of these ingredients are loaded with the nutrients that your Bonsai will thrive on, and paying that little extra can certainly promote good healthy growth from your beloved project.
Whether you decide you want to use bags of Bonsai soil or make your own soil there are certain things you need to make sure of before planting your Bonsai in the soil. A good Bonsai soil needs to have excellent drainage to make sure the water can seep to the roots and out of the bottom of the soil and through the holes in your pot. It is a good idea to have two different soils, one coarser than the other. This way, the screened soil acts as a sort of irrigation for your plants.
As well as this, you may want to consider buying nutrient supplements that you can add when repotting or mix with the soil that you use. However, if you are growing your Bonsai in a suitable area this isn’t always needed.
Confit Duck Leg and Slow Cooked Duck Breast with Cabbage - Photo: Flickr
Christmas recipe serves: 6
calories per serving: 400
preparation time: 15 minutes
cooking time: 2hours 30 minutes
suitable for freezing after step 3.
Christmas recipe ingredients:
duck legs, 6, about 2 kg (4.5 lb)
onions, 350 g (12 oz)
root ginger, fresh, 5 cm piece, (2 inches)
butter, 125 g (4 oz)
caster sugar, 15 ml (1 tbsp)
green cardamom pods, 8 whole
chicken stock, 1.7 liters (3 pints)
ginger wine, 300 ml (10 fl oz)
dry white wine, 150 ml (5 fl oz)
salt and pepper
orange juice, 45 ml (3 tbsp)
lemon juice, 15 ml (1 tbsp)
oil, 5 ml (1 tbsp)
sea salt, coarse 10 ml (2 tsp)
garnish, coarse fresh coriander
Christmas recipe instructions:
1. Simmer the duck legs gently in a large pan of boiling water for about 2 hours.
2. To prepare the sauce, fry peeled chopped onions in 50 g (2 oz) of the butter for about 10 minutes or soft. Add peeled and grated ginger, with the sugar and cardamom seeds from one pod. Cook until the color of the mixture turns dark golden brown.
3. Add the stock and boil until the volume is reduced by half. Reduce by half again till syrup like after adding the white wine and dry ginger. Add salt and pepper and orange juice to taste.
4. Stir in 25 g (1 oz) of the butter into the sauce at boiling point. Separate the onions from the liquid and combine with the rest of the butter. Keep.
5. Remove excess water from the duck and put over a roasting tin on a rack. Brush the duck with oil and sprinkle with salt and the remaining cardamom seeds.
6. Roast until the skin is very crisp. About 20 to 25 minutes at gas mark 8. (230 degrees centigrade, 450 F). Add the reheated butter and onion and serve the food with heated cardamom sauce. Garnish with coriander.
While all plants are quite apt to prosper indoors, they do need more or less the same conditions to grow as outdoor plants do. These conditions are a good supply of fresh air, proper sunlight, water and nutrients such as plant food commonly known as ‘fertilizer’.
We will include here a few tips that are sure to make your indoor plants grow healthier and add beauty to your surroundings.
Ever notice how plants will face the source of sunlight? This is because the sun is the main source of their nutrition. Plant leaves change water and nutrition from the soil to food through a process called ‘photosynthesis’.
A couple of hours of sunlight is a must for your indoor plants. If you do not have a place where you can have adequate sunlight, and cannot move the plants you should consider purchasing a couple of indoor gardening lights.
Ordinary lights will not do. Indoor gardening lights provide enough of ultraviolet light to nourish the plants.
Provide adequate water to your plants. Your indoor plants need ‘room temperature’ water to survive. Do not over water the plants, most plants die due to a lack of water or a surplus of it than they do of any other reason.
Follow a rule of thumb, like you test a cake you should pierce a knitting needle into a plant container. If the needle goes in with ease the soil is just the right dampness, if not increase the quantity of water a bit.
Fertilizers are also important, once a fortnight add a scoop of indoor plant fertilizer to your plant pot. Used tealeaves are also a very good supply of nutrition to your plant.
Follow these simple tricks and you will see your indoor garden prospering very soon.
This is a cheesecake that I have been making for over 20 years. If you follow the recipe to the “T” you won't have any problem, it is also colorful as well as the most wonderful piece of pastry that you ever put in your mouth.
1 1/4 cups graham cracker crumbs 2 tablespoons sugar 3 tablespoons butter or margarine melted 2 pounds cream cheese 1cup sugar 8 ounces sour cream 2 eggs 1cup flour ¾ cup heavy whipping cream 2 cup in total chopped candied cherries red and green raisins, walnuts, candied pineapple ½ cup small chocolate chips
In a 5 quart mixing bowl place 2 pounds of cream cheese and 1 cup granulated sugar and mix on low speed until cream cheese is softened and smooth, place in bowl 8 ounces sour cream and continue mixing until well blended, at this time add 2 eggs, mix for 2 minutes then add 1 cup flour, and 3/4 cup heavy whipping cream, mix on second speed until your cheesecake batter is smooth and creamy.
At this time your cheesecake mixture should be fluffy like ice cream as it comes out of the ice cream machine.
Prepare your 10 inch x 2 inches springform pan, in a large bowl place your graham cracker crumbs and 2 tablespoons sugar, and your melted butter or margarine, then with a wire whisk, whisk them together until well combined, brush onto the sides of your springform pan a little softened butter so the crumbs have something to hold to, place the crumbs on the sides and bottom of the pan.
Now you add slowly to the pan your cheesecake mix as not to disturb the crumbs too much, now you should have a full pan.
The total weight of the cheesecake with the crumbs on the sides should be 5 to 5-1/4 pounds if you have some batter leftover just chill it, put some whip cream on it and enjoy.
Preheat your oven to 275 degrees and not more, when your oven is hot place the cheesecake in it and bake for 55 minutes then shut off the oven and let it in there for 3 hours, at the end of this time you should have the most beautiful cheesecake you ever have seen, let the cheesecake on the table for 1 1/2 hours then place it in the refrigerator for about 2-3 hours. Now remove it from the pan and enjoy.
Before serving sprinkle some red and green edible glitter that you can purchase at any store that has decorating supplies.
Most composting is done in the spring and summer months. The reason is that heat is such an important element to the process. Even though the composting process itself generates heat, the warmth from the weather certainly helps everything along.
Most composts go dormant in the winter months and start up again with the spring thaw and warmer temperatures. But if you live in a milder climate that does not get harsh winters, there is a way to continue to compost during the winter months.
You can create an insulated compost bin. Using a plastic garbage can dig a hole big and deep enough to put at least six inches of the can underground. Use a natural insulating material such as straw and pack it around the base and up the sides of the can. Continue to compost as you would at any other time of the year.
Even though this method will still work in the winter months, the speed at which the material will decompose will still be slowed down. Winter composting will allow you to continue recycling your kitchen scraps throughout the colder months and you may even have compost at the beginning of spring to use in your garden.
The spring and fall are the best times to collect leaves to start a new compost bin. In the spring, the leaves you collect have already started to decompose as they stayed wet and insulated throughout the winter. It doesn’t matter though if you collect your leaves in either season – they are the perfect base for a new compost pile. If you are using dry leaves from the fall, consider putting them through a chipper of some kind. If they are smaller and already cut up it will aid in the whole composting system.
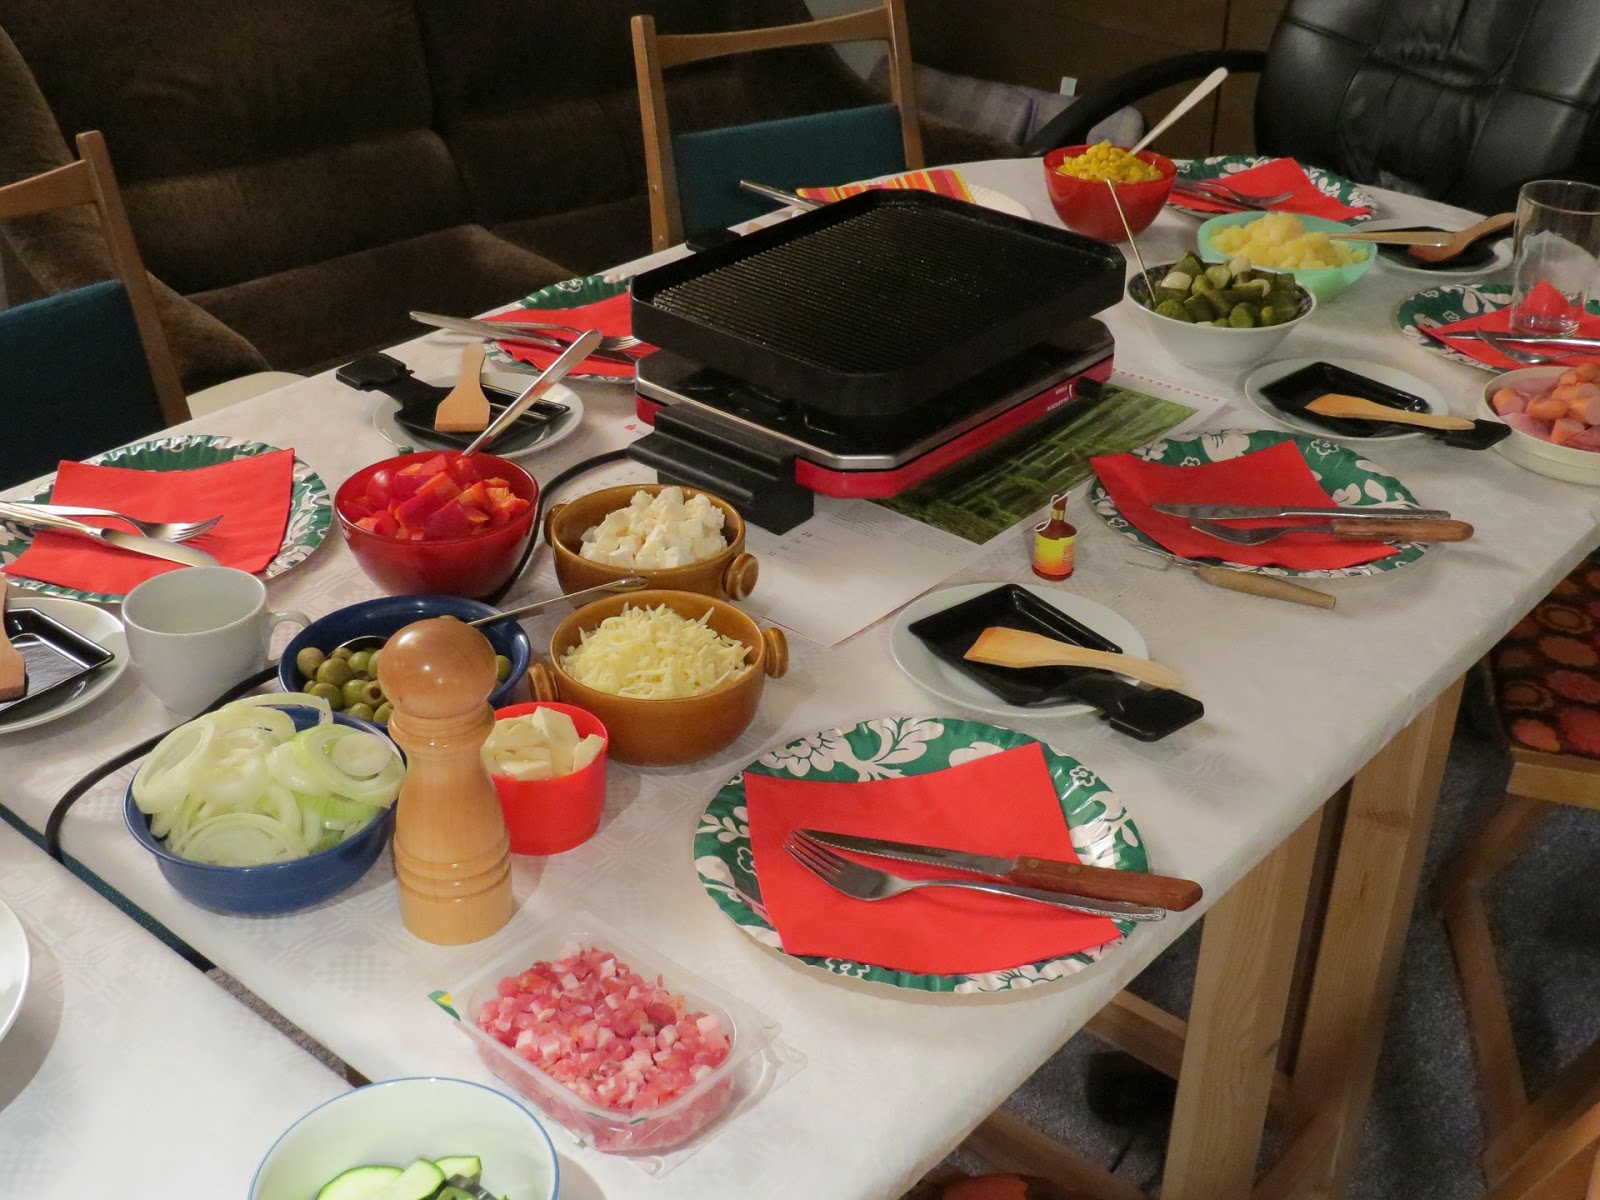
Yes, the fondue pot of the ’70s was pretty cheesy, but in this century, nothing is more cheesy than raclette. In recent years fondue pots have experienced a resurgence in popularity, and with them has come to the raclette grill. Though not traditionally well known in the US and Canada, raclette is suddenly experiencing a boom in popularity.
Raclette is a semi-soft, relatively mild, easily melted cheese from Switzerland. The term also refers to the cooking method of melting cheese at a tabletop grill and serving with a variety of accompaniments.
Legend has it that the original method for melting the raclette cheese began when Swiss herdsmen settled down for the night in their camps. They placed a hunk of cheese near their campfire and as it melted, scraped it off onto a slice of bread.
Today, this same meal is mimicked but with a much greater variety of foods, and with electric raclette grills that are much more convenient. Though the melting method has changed over the years, this simple and entertaining meal has remained just as enjoyable for entertaining evenings with friends and family.
There are several kinds of raclette grills that you can choose from. Traditional raclette grills hold a half- or quarter-round of raclette cheese on an angle, with a heating element melting the surface of the cheese, which drips onto a plate of dried meats and other accompaniments.
Today, the most common raclette sets include a cheese-melting element with a grill for cooking meats at the table. They provide up to 8 people with individual cheese pans and feature non-stick, dishwasher safe surfaces for convenience and easy cleanup. Perfect for entertaining!
Portable raclette using fondue-type burners are also available for camping and picnicking.
A raclette grill can provide not only a delicious, hot-off-the-grill meal but also provide a lot of fun for family and friends. For optimum enjoyment, serve traditional raclette with a Fendant or other light-bodied dry white wine. If you are grilling meats, serve a wine appropriate for the meats.
A traditional Swiss raclette meal uses raclette cheese with the following accompaniments:
- baguette bread
- small cooked potatoes
- small gherkins
- pickled onions
- charcuterie meats such as salami or prosciutto
You can also get very creative with a raclette meal. A departure from tradition – but an adventure in taste – could include:
Raw meat for grilling and dipping into sauces:
- Italian sausage cut into 1/4” slices
- Chicken tenderloins cut into 1” pieces
- Beef tenderloin cut into 1/2” cubes
- Shrimp and Scallops
Thinly sliced cheeses:
- Brie
- Camembert
- Oka
- Cheddar
- Cambozola
Vegetables blanched to al-dente, such as:
- Mushrooms
- Broccoli
- Cauliflower
- Asparagus
Here are two excellent recipes for dipping sauces for your meats and vegetables:
Pimento Sauce
3/4 cups mayonnaise
1/4 cup sour cream
2 tablespoons tomato sauce
1/2 cup canned pimentos or 1 red bell pepper, roasted with skin removed
Salt and pepper, to taste
Blend all ingredients in a blender. Season to taste. Serve chilled.
Cucumber Garlic Sauce
1/2 cup mayonnaise
1/2 cup plain yogurt
1/2 cup sour cream
2 cloves of garlic, finely chopped
1/2 teaspoon salt
1/4 cucumber, peeled and finely chopped
1 tablespoon of finely chopped chives or green onion