Monday, June 1, 2020

A Birdseye View into the Different Types of HYDROPONIC GROWING Systems

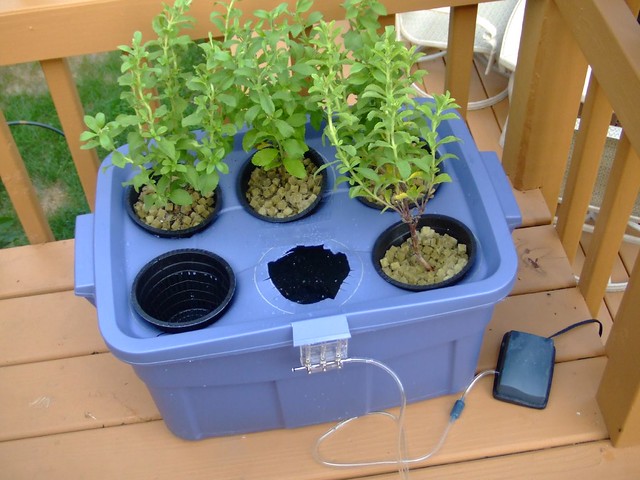
Hydroponic Stevia Garden
Photo by J Wynia
Hydroponic gardening is the way of the future for environmentally controlled agriculture.

Hydroponic gardening eliminates soil-borne pests and diseases and maximizes water and nutrient uptake by the plant.  Incredible yields can be achieved in a relatively small space with hydroponic systems.  There are many types of hydroponic systems available for home and commercial use.


These systems include the Europonic Rockwool System, the Ebb and Flow System, Aeroponic Systems, Continuous Drip Systems, and Rock wool Based Systems. Hydroponic systems come in all shapes and sizes and can be adapted for nearly any budget.

Nutrient Film Technique, or NFT, is another popular system.  The plants are held in troughs with nutrient solution constantly trickling over the roots.  A reservoir with a pump that is submersible re-circulates the nutrient solution continually, pumping the solution to the top of the troughs to trickle back through the system.  Larger Nutrient Film Technique systems are used commercially, both abroad and in the United States.  When choosing a Nutrient Film Technique system, care must be taken to choose the correct trough size.

Large commercial systems use wider troughs with greater flow capacity.  Aeroponics is a system in which the plant’s roots are suspended in the air.  They are excellent for growing herbs and leafy vegetables.  The plants are held in web pots with neoprene inserts to support the plant.  Different hold configurations in the top cover provide the proper spacing.  Aeroponic systems are also great propagators.  The seedlings can be germinated in Rockwool then transferred directly to the web pots.

The Europonic System is modelled after commercial systems that are used in Europe.  A basic system has three trays and holds eight plants each.  The system may also be expanded to five trays if desired.  A nutrient solution is pumped from a thirty-gallon reservoir to individual emitters at each plant.  The solution trickles through the rock wool, over the roots, and back to the reservoir where it is re-circulated on a constant basis.  Rock wool, or mineral wool, is the most popular and highly used hydroponic medium.  It is made from spun material fibres and has a high water and air holding capacity.

The Europonic System uses rock wool slabs with two slabs fitting into each tray.  Rock wool is easily able to support a relatively extensive root system so the Europonic System is ideal for vine crops such as tomatoes, cucumber, and peppers, plus large flowering plants.


In a continuous drip system, a single pot is used with a two-gallon reservoir underneath.  The system acts like a percolator as air is pumped down a vertical shaft, creating pressure, and nutrient solution is forced up another tube.  A drip ring constantly irrigates the substrate, and the nutrient solution drains back into the reservoir.  This type of system is easy to use, inexpensive, and great for individual experimentation.  However, it is impractical for most commercial applications.  Ebb and flow systems are also popular in hydroponics.  They are good for crops such as lettuce, pepper plants, miniature tomatoes, and potted flowers.

As the water evaporates between flooding, the salts are left behind as a residue and may rise to toxic levels.  It is best to flush the system with pure water periodically to take away any toxic salt buildup.


Sunday, May 31, 2020

A Brief History of PIZZA: The Dish that Conquered the World

A supreme pizza with tomatos sauce, cheese, pe...
A supreme pizza with tomato sauce, cheese, pepperoni,
peppers, olives, and mushrooms
(Photo credit: 
Wikipedia)
Pizza, the way we know it today, is a derivation from focaccia (from the Latin word for fire), a flatbread that has been prepared since antiquity in different forms and garnished with herbs, olives, fat, raisin, honey, and nuts. 

The word pizza in Italian identifies any type of flatbread or pie—fried or baked. Although you’d find many types of pitas or pizzas around the Mediterranean, it is in Naples that pizza in the form we know it today first emerged, after the tomato appeared on the table in the 1700s. Naples has many records of pizza since around the year 1000; the first mentions call these flatbreads Lagana, and later they are referred to as picea. In those times, pizzas were dressed with garlic and olive oil, or cheese and anchovies, or small local fish. They were baked on the open fire and sometimes were closed in two, as a book, to form a calzone. 

 In Naples is also where the first pizzerias opened up, with brick wood-burning oven, covered with lava stones from Mount Vesuvius. The chefs of those times ignored pizza because it was considered a poor people’s food, but the new combination with the tomato, when it entered the kitchen around the 1770s, must have raised some curiosity, even in the royal palace. Ferdinand I Bourbon, King of Naples, loved the simple food of the people and went to taste the pizzas made in the shop of Antonio Testa. He liked it so much that he wanted pizza to be included in the menu at the court. He failed after the opposition of his wife, Queen Maria Carolina. His son Ferdinand II also liked all kinds of popular food and he loved pizza to the point that he hired Domenico Testa, son of the now famous Antonio, to build a pizza oven in the royal palace of Capodimonte. 

Pizza became very popular, earning its place in Neapolitan folklore. Simple and economical, it turned into the food for all people, even sold on the streets, as shown in many illustrations of the time. 

A famous episode extended the popularity of pizza beyond the limits of the city of Naples. It was 1889, and Margherita, queen of Italy, was visiting the city. She was told about pizza and wanted to taste it. A famous cook by the name of Don Raffaele, helped by his wife Donna Rosa, was invited to cook pizza at the royal palace. They prepared three pizzas, typical of that time: one with cheese and basil; one with garlic, oil, and tomato; and one with mozzarella, basil, and tomato. The queen, impressed by the colors of the last pizza, which resembled the national flag, preferred that one. Since then this pizza is known as Pizza Margherita, and Don Raffaele is credited with its invention, even if we know that it already existed for a long time. 


At the beginning of the last century, with Italian immigrants, the first pizzerias appeared also in the United States, where pizza has become a mass phenomenon. Yet, even today the best pizza is found in Naples, where it is rigorously made with buffalo mozzarella. Superior pizzas are considered those obtained by moderate variations of the simplest and most popular: Pizza Napoletana with tomato, garlic, oil, and oregano; Pizza Margherita; Pizza Marinara with tomato, anchovies, capers, and olives; and Pizza Four Seasons, divided into four quadrants, each dressed in a different way. Pizza with hot salami, the American pepperoni pizza, is instead found in the Calabria region south of Naples, where this type of hot sausage is produced.


Sunday, May 17, 2020

How to make tomato plants produce more TOMATOES?

Bush tomato plant
Bush tomato plant (Photo credit: Wikipedia)
Ah, it is summertime and you want to take up planting and gardening as a hobby. Who can blame you! It is a relaxing, fun, and rewarding hobby. If you are trying to plant tomatoes, and you have no clue how it works, read on. I am a total newbie to green thumbing my way through life.

First, you have to “Make sure you buy healthy tomato plants so you will be getting more tomatoes from your plants. If the plant is not sturdy to start with, Miracle grows can give it a boost. Follow the directions on the container, so you give it the correct nutrients. Keep feeding your plants tomato Miracle grow plant food as directed.” Okay, so we have got this down. We need to make sure the plants are healthy. Check!

Next, let the digging begin. Say what! I said start digging, “dig a hole that will cover at least 2 swirls of the plant. Yes, that is right! You will be burying some of the tomato plant branches to get more tomatoes from them. This idea gives the plant a better root system.” Alright, so we dig to keep the plant firmly rooted in the ground. The deeper the hole, the better off we are.

As the plant grows, you need to watch out for the branches. “As the tomato plants grow, take off a few of the branches that do not have buds or flowers on them. Again you are giving your tomato more nutrients to fewer stems and you will get more tomatoes from these plants by snipping one or two every now and again throughout the growing season of your tomato plant.” Remember, we are taking off the branches, not just the leaves. You want to get rid of any excess branches that are not blossoming.

Then, we need to talk about watering the plant. “Water every day by moistening the ground and not wetting the plant. The leaves can be parched by the sun if you let them get wet from watering. A tomato needs frequent watering to produce more tomatoes. “

Here’s an old trick that e-How shares with us, “An added idea is to place an old tire around the plants. Fill the tire rim with water. This creates a warm water mist to your tomato plants as the sun hits the rubber. You will get more tomatoes from your plants if you place the tire after you plant them in your garden.”


Alright, let us summarize the steps: make sure the plants are healthy. If they are not healthy, make them healthy with some Miracle Grow. Then, make sure they are rooted, supported, and watered!


Sunday, May 10, 2020

GOUDA ONION DIP

Wow! This onion dip is not your typical out of the package dip. Instead, you pretty it up with a scooped-out ball of Gouda cheese. No kidding! Because it's so beautifully self-contained, it travels well when you want to take this as an appetizer to a party. Not only that, but your friends will be bowled over by the presentation and the great flavor. There will be no leftovers!

French Onion Dip from Saveur
Photo by whitneyinchicago
What you'll need:

- one 10-oz ball of imported Gouda cheese
- 4 Tbsp unsalted butter
-1 small yellow onion (finely chopped)
- 4 oz Roquefort cheese (crumbled)
- 4 oz sharp cheddar cheese (finely grated)
- 1 tsp Worcestershire sauce
- 3 drops of hot pepper sauce
- 1 tsp whole-grain mustard
- 4 Tbsp dark beer or stout

With a sharp knife, cut the top to make a lid from the Goulda cheese ball, about 1 inch thick. Save the lid. Hollow out the cheese without cutting through the wall of the ball. The wall should be as thin as you can make it on all sides. Take the reserved Gouda cheese and grate it and set aside.

In a small skillet, heat 2 Tbsp of the butter over medium heat. Add the onion and saute until it reaches a golden brown color. This usually takes about 7 to 10 minutes. Stir often. Remove the onion from the skillet and set aside to cool.

Combine the Gouda, Roquefort, and Cheddar cheeses in a food processor, along with the remaining butter, the onions and the Worcestershire, mustard, and hot pepper sauce. Process the mixture until smooth. Scrape the sides occasionally. Pour in the beer and continue to process until smooth and creamy.

Next, fill the hollowed out Gouda ball with the mixture. You'll probably have more mixture than will fit in the ball. Place the lid on the ball of cheese and put the remaining dip into a bowl. Cover both with plastic wrap and refrigerate before serving.

One nice aspect of making this dip is that if you make it a day ahead, it actually enhances the flavor. When you serve the dip, bring out the Gouda ball in time to reach room temperature. You can use the additional dip to refill the cheese ball.

This recipe makes approximately 2 cups. You must refrigerate it at least 4 hours before serving.

Enjoy with Homemade Potato Chips, Bagel Chips and Pita Chips.


Friday, May 8, 2020

An Introduction to No-Dig Gardening

 
No dig new bit of garden with newly planted Artichokes  - Flickr
The idea of no-dig gardening was developed by an Australian named Esther Deans. It was originally both developed both as a labor-saving idea and a method to rejuvenate badly depleted soil in a vegetable garden.

The process involves starting with layers of newspaper, and by adding lucerne hay, straw and compost in succeeding layers, you can create a growing medium without resorting to heavy digging, and one that is rich in nutrients and which will simplify weeding and encourage your much-desired plants to grow. The layers compost together, and greatly encourage earthworms. The gardens are maintained by adding manure, compost, etc., and should not be dug up, as this will undo the good work. I have used this approach to creating vegetable gardens, and it certainly does work.

The principle of not digging has sound foundations. Excessive cultivation of the soil, especially when very wet or very dry, will damage the structure of the soil, and lead to compaction. Such excessive cultivation can also discourage the earthworms, and they are the best free labor a gardener has.


Some followers of permaculture and organic gardening have translated no-dig into never-dig, which I believe is sadly mistaken. If you start with a base soil that is badly compacted, then your no-dig garden will initially work well, but you may find your garden does not continue to perform well. The fertile layer you have built up will encourage the earthworms, but we do know that the worms need to shelter from excessively hot, dry, cold, or wet conditions. They have been found to seek shelter from extreme conditions by burrowing more deeply into the soil, sometimes many feet down. If they cannot shelter in this way, it is my contention that they will die out or move out. 

My belief is that initial cultivation of the soil before you apply the no-dig system will guarantee a better environment for the worms, and thus a better garden for growing your plants, over the longer term. 

By all means, give the no-dig approach a try – you will be pleased with the result.


Sunday, May 3, 2020

Different Ways To Cook RICE

Rice Diversity. Part of the image collection o...
 (Photo credit: Wikipedia)
Rice needs to be thoroughly washed. A good way to do this is to put it into a colander,  in a deep pan of water. Rub the rice well with the hands, lifting the colander in and out the water, and changing the water until it is clear; then drain. In this way, the grit is deposited in the water, and the rice left thoroughly clean. 

The best method of cooking rice is by steaming it. If boiled in much water, it loses a portion of its already small percentage of nitrogenous elements. It requires much less time for cooking than any of the other grains. Like all the dried grains and seeds, rice swells in cooking to several times its original bulk. When cooked, each grain of rice should be separate and distinct, yet perfectly tender. 

Steamed rice.

Soak a cup of rice in one and a fourth cups of water for an hour, then add a cup of milk, turn into a dish suitable for serving it from a table, and place in a steam-cooker or a covered steamer over a kettle of boiling water, and steam for an hour. It should be stirred with a fork occasionally, for the first ten or fifteen minutes. 

Boiled rice (Japanese method).

Thoroughly cleanse the rice by washing in several glasses of water, and soak it overnight.  In the morning, drain it, and put to cook in an equal quantity of boiling water, that is, a pint of water for a pint of rice. For cooking, a stewpan with a tightly fitting cover should be used. Heat the water to boiling, then add the rice, and after stirring, put on the cover, which is not again to be removed during the boiling. At first, as the water boils, steam will puff out freely from under the cover, but when the water has nearly evaporated, which will be in eight to ten minutes, according to the age and quality of the rice, only a faint suggestion of steam will be observed, and the stewpan must then be removed from over the fire to someplace on the range, where it will not burn, to swell and dry for fifteen or twenty minutes. 

Rice to be boiled in an ordinary manner requires two quarts of boiling water to one cupful of rice. It should be boiled rapidly until tender, then drained at once, and set in a moderate oven to become dry. Picking and lifting lightly occasionally with a fork will make it more flaky and dry. Care must be taken, however, not to mash the rice grains. 

Rice with fig sauce.

Steam a cupful of best rice as directed above, and when done, serve with a fig sauce. Dish a spoonful of the fig sauce with each saucer of rice, and serve with plenty of creams. Rice served in this way requires no sugar for dressing, and is a most wholesome breakfast dish. 

Orange rice.

Wash and steam the rice. Prepare some oranges by separating into sections and cutting each section in halves, removing the seeds, and all the white portion. Sprinkle the oranges lightly with sugar, and let them stand while the rice is cooking. Serve a portion of the orange on each saucerful of rice. 


Rice with raisins.

Carefully wash a cupful of rice, soak it, and cook as directed for Steamed Rice. After the rice has begun to swell, but before it has softened, stir into it lightly, using a fork for the purpose, a cupful of raisins. Serve with cream. 

Rice with peaches.

Steam the rice and when done, serve with cream and a nicely ripened peach pared and sliced on each individual dish. 

Browned rice.

Spread a cupful of rice on a shallow baking tin, and put it into a moderately hot oven to brown. It will need to be stirred frequently to prevent burning and to secure a uniformity of color. Each rice kernel, when sufficiently browned, should be of a yellowish-brown, about the color of ripened wheat. Steam the same as directed for ordinary rice, using only two cups of water for each cup of browned rice, and omitting the preliminary soaking. When properly cooked, each kernel will be separated, dry, and mealy. Rice prepared in this manner is undoubtedly more digestible than when cooked without browning. 


Monday, April 27, 2020

THYME

English: A bundle of the herb thyme that came ...
A bundle of the herb thyme that came from an organic farm co-op.
 (Photo credit: 
Wikipedia)
Thyme is a very popular and well known culinary herb. It is a very decorative plant while it is growing and is also very easy to grow as well but be prepared because bees just love Thyme. Many people use Thyme in stews, salads, meats, soups, and vegetables. Thyme is a very common household herb and is a member of the mint family. The plant is very aromatic and comes in many varieties. Thyme is a frequently used herb in many fish dishes. Oddly enough as much as honey bees love to suck the nectar from the Thyme plant is as much as other insects loathe it. Some people have been known to make a mist spray of Thyme and water and use it as a bug repellent. 

Various forms of Thyme are available year-round but many people prefer to grow their own. Nothing beats the smell and taste of fresh Thyme as long as you know to pick it just as the flowers appear. Once fresh Thyme is harvested it should be stored in either a plastic bag in the crisper or stood straight up in a glass of water on the shelf in the refrigerator for easy access.

The bad news, fresh Thyme does not have a very long shelf life, you will be lucky if it lasts a week. If you have selected fresh Thyme and decide to dry it then simply hang it upside down in a warm and dry atmosphere for about a week to ten days. Then you can crumble it into a powdery form and stored in a sealed dark container for no more than six months. You want to eliminate the stems as they have a tendency to have a woody taste to them.

Thyme has some medicinal purposes as well as an antiseptic, an expectorant, and deodorant properties as well. When combined with fatty meats Thyme has been known to aid in digestion too, especially with lamb, pork, and duck. Herbal medicine has used Thyme for various things such as extracts, teas, compresses, for baths, and for gargles. More modern medicine has chimed in and verified that Thyme just might strengthen the immune system.

Distilled Thyme oils have been used for the commercial use of antiseptics, toothpaste, mouthwash, gargle, hair conditioner, dandruff shampoo, potpourri, and insect repellant. It is also used in the production of certain expectorants that are prescribed for whooping cough and bronchitis. Thyme has also been used in part as an aphrodisiac and in aromatherapy oils as well.


If by some chance you are in the middle of cooking recipes that calls for Thyme and you find that you out do not fret, it is said that you can use a pinch of oregano as a substitute if you have to. Thyme is very often used when cooking European cuisine but is essential for the correct preparation of French foods as it has that faint lemony taste to it. It has also been said that Thyme is one of the only herbs that a cook can not over the season with because the flavor is so mild. Thyme is a primary spice that everyone should have stocked in their pantry.