Showing posts with label Baking. Show all posts

Sunday, November 1, 2020

What Frosting To Use In Your CAKE DECORATING

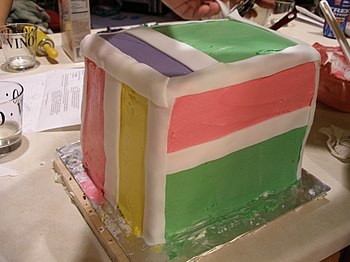
English: Birthday cake with hard white fondant...
Birthday cake with hard white fondant icing as trim, framing soft, colored buttercream frosting.
(Photo credit: 
Wikipedia)

Those of us who are into cake decorating, think of the beautiful icing designs when we think of cake. Icing is the finishing touch on cakes, cookies, and cupcakes. There are several different types of icing used in cake decorating. The choice of icing while cake decorating, will have a great deal to do with how the decorated cake will look. 

1. Buttercream Icing: Buttercream is the icing that is used the most in cake decorating. This is the same type of frosting that we can buy readymade in the grocery store. This icing is easy to use and easy to make. The ingredients are confectioners sugar, and butter or shortening. What you use to thin the frosting will differ with the icing texture you need to work with, to determine whether to use eggs or milk. Take care when thinning the frosting, remember, a little milk goes a long way. If you find the frosting is too thin, you can add a bit of confectioners sugar to thicken it.
To assure an even finish on your frosting, dip the icing spatula in cold water to make the surface smooth. This will give a smoother finish for writing. Buttercream is used to create flowers and other decorations made with a pastry bag. The icing needs to be the right consistency to make flower petals or writing. When you make roses out of icing, you can freeze them and add them to the cake later. This will make it easier to handle.

Buttercream can be stored in the refrigerator without getting hard. Make sure it is back to room temperature before you attempt to use it.

2. Foam Icing: This is a meringue and is used on a lemon pie or Baked Alaska. This frosting is made of egg whites beaten into stiff peaks. It is possible to add flavoring and color to the meringue. You will not be able to use this icing for intricate cake decorating, and you won't be able to use an icing bag with this icing. This icing is used when you want the cake to look fluffy, with little ornate decoration.

3. Fondant: This icing is very popular with those who decorate wedding cakes, and cakes for very special occasions. The ingredients are simply powdered sugar, water, cream of tartar, or glucose. Fondant is thick and doughy, with a silky, smooth, texture. Fondant will give the cake a flawless surface, and soft, rounded edges. Working with fondant is an art and will take practice to get it right. Fondant has a translucent quality and will work best when placed on the cake over a thin layer of buttercream frosting.

4. Fudge Icing: Fudge icing is made from chocolate, peanut butter, almond, or mint. This icing is quite thick and contains both shortening and butter.

5. Glazes: This frosting is thin and watery, and will harden into a shell after it is placed on the cake. This frosting is mostly used on pastries. Glazes help to keep the pastry moist. 

6. Flat Icing: This icing is similar to a glaze, but it is a bit thicker. Flat icing is a combination of confectioner's sugar and water and is used to drizzle onto pastries.

7. Royal Icing: This is also a flat icing, and hardens after it is set. Royal icing is a wonderful choice to make flowers, sculptures, and garnishes for cake decorating.


You can use any combination of the basic seven icings listed, to create a personal masterpiece. You will need to practice before you become good at cake decorating. You will get the hang of it sooner than you think, and even the mistakes will taste great.


Sunday, June 21, 2020

A Few CAKE DECORATING Ideas

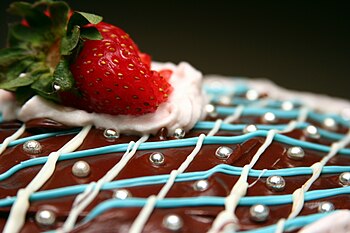
English: A chocolate cake decorated with icing...
A chocolate cake decorated with icing, strawberries, and silvery sugar beads.
(Photo credit: 
Wikipedia)
Did you know that the first cakes baked in America where small loaves of sweet bread? Look how far we have come. Home bakers should not be intimidated by the elaborate cakes being made today. You do not need to be a pastry chef to make beautiful cakes, you just need the know-how and practice. Of course, the right tools will go a long way in your cake decorating endeavors. Here are a few ideas you might like to try.

Every cake worth merit starts with a smooth icing. The cake needs to cool completely before they are iced and decorated. To keep crumbs from ending up in your icing and ruining the look of your cake, start with a thin base coat of frosting that is not quite as stiff as the regular layer will be. Once this coat is on, set the cake in the refrigerator for 20 minutes. This will set the icing and any crumbs will be caught in this first layer. Now you can spread a regular layer of icing without worrying about crumbs.

Use an icing spatula to apply and smooth the second coat of icing. Once the icing is on the cake, start smoothing on the sides by running the spatula around the perimeter of the cake. One trick for smoothing the frosting is to dip the metal icing spatula in cold water, this will aid in smoothing the frosting. To smooth the top, dip the spatula in cold water and holding it horizontally over the top of the cake. Start at the point farthest from you, holding the spatula in both hands, skim the top of the icing by bringing the spatula straight toward you.

Simple Designs

Some cake decorators say learning to smooth the icing is the hardest part of cake decorating. Practice will make you a pro in not time. Once you have it down, show it off, even a cake without many decorations that is clean and smooth will make a perfectly elegant offering.

Instead of icing, cake tops can be dusted with powdered sugar. You can choose to use a stencil for a more decorated appearance, or just the powdered sugar for a clean look.

Edible decorations are a beautiful yet simple cake decorating technique. The use of sprinkles, candy, nuts, and coconut pressed into the icing before it sets, will make your cake stand out.

To apply a textured look for your cake decorating, use a small cardboard comb, available in baking supply stores. 

Piping is achieved by using a pastry bag fitted with a metal tip that is held on by a coupler. This is your most important tool for cake decorating. You can make lines, words, shells, flowers, and many other designs on the top or sides of the cake. Fill the bag with no more than 1 cup of icing at a time, twist the top of the bag and keep steady pressure when piping the design. Use your other hand to guide the tip. It is wise to find out everything you can about piping before you begin.


Fondant a smooth white paste, is used in complicated cake decorating. Fondant is kneaded and rolled to cover cakes with a sleek smooth layer of icing. It is also used to make designs that are 3-D. It is less tasty than buttercream, but the cake will look sleek and elegant.


Monday, August 6, 2018

Grandmas FRUITCAKE

Fruitcake
Fruitcake (Photo credit: Wikipedia)
As a child around 1920's or so, while living on a farm in Pennsylvania which at that time there were a great number of people who came from Europe, you needed to be able to do for yourself, she learned from her mother how to make a most delicious white fruit cake, a white fruitcake is a fruitcake that does not have any molasses, molasses which is very bitter, not having the molasses in the fruitcake gives it a lighter color, this gives it the name white fruitcake.

This fruitcake in the days in which my mother lived as a child with her parents this was only made during Christmas because the only time you could get walnuts, cherries, and some other ingredients was in the fall of the year, remember how they didn't go to the store to buy what they needed, they had to grow them, raisins were dried by the people themselves, they even had to shell their own walnuts, and candy their own cherries, and such the pineapple and coconut I do believe they must have purchased.

To keep with tradition the only time of the year that I make or sell this fruitcake is during the Christmas holidays, and In my mind, you cannot get a better fruitcake. Here we go now gather up your ingredients and set them on your table, all ingredients need to be at room temperature.

1 pound butter
12 eggs
1 lb. sugar
1 pound flour
1 pound white raisins
1 pound walnut meats
1 lb. red and green candied cherries
1 lb. bakers flaked coconut
1 lb. candies pineapple
1 tablespoon of baking soda dissolved in ¼ cup warm water
2 cups brandy--any brand


Soak the raisins, walnuts, cherries, coconut, and pineapple with 2 cups brandy overnight in a stainless steel bowl.

In a 5-quart mixing bowl cream butter and sugar, then add eggs slowly, then add your flour and blend well, add the baking soda and water and mix a minute more, add all other ingredients and mix until well blended.

Now you are going to bake it in a 2-pound pan, or in the pan of your choice, foil or hardpan, line the pan with wax paper or baking paper or better yet a pan liner the size of the pan. For a 2 pound pan, Place 1 pound 12 ounces of the mixture in the pan and level it with a spoon, don't bang it on the table. Bake it in a 350 degree preheated oven for 1 hour to 1 hour 20 minutes, depends on your oven and how brown you want it.

It's done when a pick is placed in the center and it comes out clean. Let it cool on a rack for a while and then sprinkle it with 1 ounce of brandy and then another ounce when it is cool and then pack it away for about 3 days in your refrigerator and then “enjoy it”.


Monday, April 23, 2018

How To Make Candied Fruit For CAKE DECORATING

English: Home made cake decorated with grapes,...
Homemade cake decorated with grapes, candied cherries, and slices arranged as number 9
 (Photo credit: 
Wikipedia)
I remember my mother making fruit cake, she would use candied cherries that she would buy them in little airtight containers. They came in two colors, red and green, but they did not have the best taste. The candied fruit available now is much more beautiful and tastier than it was then. Trust me it isn't just for fruitcakes anymore.

Making your own candied fruit to use as a garnish for dishes, in cookies, as a snack, and in cake decorating. Making candied fruit is a simple process. You infuse fruits and citrus peelings in a sugar syrup. You can candy orange wedges, orange peel, lemon peel, grapefruit peel, pineapple and fresh cherries. You can also candy fruits, such as carrots for carrot cake decorating.

You will need two saucepans, one for making the syrup, and another to blanch the fruit. This is a recipe for a Candied orange peel.

Simple Syrup

This syrup is used for making candied fruits, adding flavor to cold drinks, and adding moisture to sponge cake. There are different strengths of simple syrup for different uses. Thin simple syrup, made with 1 part sugar to 2 parts water, is used to brush on cake layers, mostly sponge cake, to provide extra moisture and sweetness. A medium simple syrup is made with equal parts of sugar and water. This is excellent for adding sweetness to mixed drinks, coffee, iced tea and to candy fruit. A syrup made of 2 parts sugar and 1 part water is used as a base for sorbet and making rock candy.

Combine equal parts of sugar and water in a medium saucepan. Bring to a boil and let the sugar dissolve. You do not need to stir the syrup, but if you do it will do no harm. You can flavor the syrup. Take the syrup off the heat and cool slightly. Stir in 1 or 2 tsp. Of vanilla for a basic vanilla syrup. This syrup can be kept in a lidded jar in the refrigerator for up to a month.

Remove the bottom and top of an orange. Set the flat end of the orange on a cutting board. With a sharp paring knife, slice the peel off in strips, starting at the top and slicing downward, following the curve as much as possible. Don't worry about cutting off the white pith of the peel. Although it is usually bitter, blanching it will make it translucent and the syrup will sweeten it.

You can candy the peel as it is, or cut into strips that are 1/4 inch wide, to use in cake decorating and garnishes. You can also dip it in chocolate and use it as a snack. Larger peels, like grapefruit, should be cut into strips for even cooking.

Place the peel in a pot of cool water. Bring water to a rolling boil, remove from heat and transfer the peel into a colander to drain. Repeat the process twice more. For grapefruit or a more tart flavored fruit, you will need to blanch them seven or eight times. Cherry and pineapple do not need blanching and can be placed directly into the syrup. Between blanching taste the peel, if it is tender it has been blanched enough. Place the peel into the pot of syrup and bring to a low simmer. Let simmer for 15 to 30 minutes or until the orange rind becomes translucent and the peel tastes sweet and tender


Remove the pot from heat and let it cool. The orange rind can be stored in its own syrup for weeks in the refrigerator. You may choose to drain them and roll them in sugar. Sugared rinds tend to dry out quite fast and should be eaten within a couple of days. You can dry the peel and dip it in tempered chocolate to make it last a bit longer.

You can use the orange flavored syrup in other drinks or dishes. Nothing really goes to waste!


Wednesday, April 20, 2016

Simple CAKE DECORATING Ideas

Cake decorating is not as difficult as it seems. We look at the elaborately decorated masterpieces and feel completely intimidated. Here are a few simple ideas and hints to make your cake decorating project a winner.

English: Buttercream swirls are piped onto the...
Buttercream swirls are piped onto the sides of a cake.
The buttercream icing covering the cake was smoothed to a fondant-like satin finish.
(Photo credit: 
Wikipedia)

- Buy readymade cakes, or make your cake from a mix.

- Make sure you have several pastry bags, a coupler, a flower nail, and 6 icing tips- #824 large open star, #23 small open star, #104 small rose, #125 large rose, and #109 and #129 drop flowers.

- A turntable makes icing a cake much easier. A lazy susan will work.

- Use decorations that are already made- fresh flowers, silk flowers, ribbons, and fruit are some of the items you can use.

- Always brush fresh fruit with a glaze to seal in moisture.

- Use a decorative cake plate or platter to present your cake.

- Use Ganache icing.

Ganache

1 pound semi sweet chocolate, finely chopped
1 cup heavy cream or evaporated milk
1/4 cup sugar
4 tsp. unsalted butter

Place the chocolate in a bowl.

Combine cream, butter, and sugar in a pan, bring the mixture to a boil.
Pour the mixture over the chocolate, stirring gently until it is melted.
Using royal or buttercream icing, ice the cake with a thin coating, and freeze for 15 minutes.
Place a cooling rack on a cookie sheet.
Make sure the icing is set, and place the cake on the cooling rack.

Quickly pour the ganache over the top of the cake and down the sides. You can use a spatula to smooth the surface if needed. The hot ganache will melt the icing, so only smooth as necessary. Tap the rack to remove any excess ganache, this can be refrigerated for later use.
Chill the cake until set, remove to a serving platter.

Fruit Flan

You can choose to purchase a pre-made flan, or bake one yourself.
Slice your choice of assorted fruit and arrange it on the cake surface in concentric circles.
Coat with apricot glaze.
Serve on a decorative cake plate or platter.

Apricot Glaze

12 oz. jar of apricot jam
2-3 tbsp. Water

Combine jam and water in a saucepan.
Bring ingredients to a boil.
Strain glaze and keep in the refrigerator until needed.
Heat to brush on fruit.

Piping

Using a pastry bag and the tip of your choice, you can create a number of cake decorations, ranging from flowers to simple borders. Basic icing recipes can be found on the internet. Work on a piece of waxed paper before you apply any icing to a cake.


Apply icing to your cake
Decorate the cake with piping if you desire
Distribute edible flowers in a decorative fashion


I hope that any, or all, of these tips will help you with your cake decorating projects. My suggestion is to gather all of the tips, tricks, and ideas you can find and print them out. Put your collection in a binder and the next time you are having a problem with your cake decorating project, you will have an answer at your fingertips.


Tuesday, April 19, 2016

Why CHEESCAKES make the perfect gift.

Cheesecake makes a perfect gift. There are guidelines that should be followed when choosing the perfect gift. For one thing, the gift should be chosen specifically for a certain individual whose tastes are known to you. 

English: New York Cheesecake
New York Cheesecake
(Photo credit: 
Wikipedia)

If you are not well acquainted with the recipient, you must give a general-type of gift that will not offend. Another guideline for choosing the perfect gift is that the gift must fit, and most important, if the recipient doesn't like the gift, it must be passed on to someone else.

Do you know anyone who doesn't like cheesecake and wouldn't consider it the perfect gift? For gift-giving occasions the ultimate gift is one that is adored and can be shared with others, and this makes cheesecake the perfect gift. Even if the recipient is on a low fat, no fat, no sugar or no carb diet, cheesecake is the perfect gift because it can be made to adhere to almost any diet by carefully choosing the ingredients. In today's society there is almost no limit to the availability and variety of ingredients that go into a cheesecake.

Can you imagine the pleasure on the face of that special someone on whom you have bestowed a freshly made cheesecake? Add a few different toppings such as a variety of fruit toppings and streusels to adorn the cheesecake and you have created the perfect cheesecake gift. There are different varieties of cheesecakes such as the original New York Cheesecake, which is probably the most well known of all the varieties.


Create a cheesecake in your own kitchen and present it in a special dish to a special person. When you see the pleasure on their face, you'll know that cheesecake makes the perfect gift.
Send a Cheesecake to someone special today.