Showing posts with label Cake Decorating. Show all posts

Sunday, November 1, 2020

What Frosting To Use In Your CAKE DECORATING

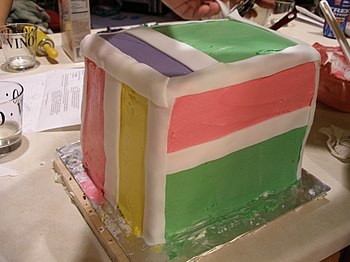
English: Birthday cake with hard white fondant...
Birthday cake with hard white fondant icing as trim, framing soft, colored buttercream frosting.
(Photo credit: 
Wikipedia)

Those of us who are into cake decorating, think of the beautiful icing designs when we think of cake. Icing is the finishing touch on cakes, cookies, and cupcakes. There are several different types of icing used in cake decorating. The choice of icing while cake decorating, will have a great deal to do with how the decorated cake will look. 

1. Buttercream Icing: Buttercream is the icing that is used the most in cake decorating. This is the same type of frosting that we can buy readymade in the grocery store. This icing is easy to use and easy to make. The ingredients are confectioners sugar, and butter or shortening. What you use to thin the frosting will differ with the icing texture you need to work with, to determine whether to use eggs or milk. Take care when thinning the frosting, remember, a little milk goes a long way. If you find the frosting is too thin, you can add a bit of confectioners sugar to thicken it.
To assure an even finish on your frosting, dip the icing spatula in cold water to make the surface smooth. This will give a smoother finish for writing. Buttercream is used to create flowers and other decorations made with a pastry bag. The icing needs to be the right consistency to make flower petals or writing. When you make roses out of icing, you can freeze them and add them to the cake later. This will make it easier to handle.

Buttercream can be stored in the refrigerator without getting hard. Make sure it is back to room temperature before you attempt to use it.

2. Foam Icing: This is a meringue and is used on a lemon pie or Baked Alaska. This frosting is made of egg whites beaten into stiff peaks. It is possible to add flavoring and color to the meringue. You will not be able to use this icing for intricate cake decorating, and you won't be able to use an icing bag with this icing. This icing is used when you want the cake to look fluffy, with little ornate decoration.

3. Fondant: This icing is very popular with those who decorate wedding cakes, and cakes for very special occasions. The ingredients are simply powdered sugar, water, cream of tartar, or glucose. Fondant is thick and doughy, with a silky, smooth, texture. Fondant will give the cake a flawless surface, and soft, rounded edges. Working with fondant is an art and will take practice to get it right. Fondant has a translucent quality and will work best when placed on the cake over a thin layer of buttercream frosting.

4. Fudge Icing: Fudge icing is made from chocolate, peanut butter, almond, or mint. This icing is quite thick and contains both shortening and butter.

5. Glazes: This frosting is thin and watery, and will harden into a shell after it is placed on the cake. This frosting is mostly used on pastries. Glazes help to keep the pastry moist. 

6. Flat Icing: This icing is similar to a glaze, but it is a bit thicker. Flat icing is a combination of confectioner's sugar and water and is used to drizzle onto pastries.

7. Royal Icing: This is also a flat icing, and hardens after it is set. Royal icing is a wonderful choice to make flowers, sculptures, and garnishes for cake decorating.


You can use any combination of the basic seven icings listed, to create a personal masterpiece. You will need to practice before you become good at cake decorating. You will get the hang of it sooner than you think, and even the mistakes will taste great.


Sunday, June 21, 2020

A Few CAKE DECORATING Ideas

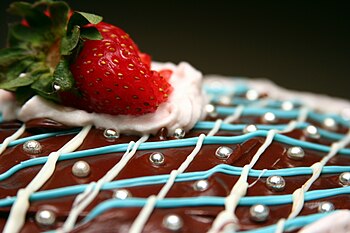
English: A chocolate cake decorated with icing...
A chocolate cake decorated with icing, strawberries, and silvery sugar beads.
(Photo credit: 
Wikipedia)
Did you know that the first cakes baked in America where small loaves of sweet bread? Look how far we have come. Home bakers should not be intimidated by the elaborate cakes being made today. You do not need to be a pastry chef to make beautiful cakes, you just need the know-how and practice. Of course, the right tools will go a long way in your cake decorating endeavors. Here are a few ideas you might like to try.

Every cake worth merit starts with a smooth icing. The cake needs to cool completely before they are iced and decorated. To keep crumbs from ending up in your icing and ruining the look of your cake, start with a thin base coat of frosting that is not quite as stiff as the regular layer will be. Once this coat is on, set the cake in the refrigerator for 20 minutes. This will set the icing and any crumbs will be caught in this first layer. Now you can spread a regular layer of icing without worrying about crumbs.

Use an icing spatula to apply and smooth the second coat of icing. Once the icing is on the cake, start smoothing on the sides by running the spatula around the perimeter of the cake. One trick for smoothing the frosting is to dip the metal icing spatula in cold water, this will aid in smoothing the frosting. To smooth the top, dip the spatula in cold water and holding it horizontally over the top of the cake. Start at the point farthest from you, holding the spatula in both hands, skim the top of the icing by bringing the spatula straight toward you.

Simple Designs

Some cake decorators say learning to smooth the icing is the hardest part of cake decorating. Practice will make you a pro in not time. Once you have it down, show it off, even a cake without many decorations that is clean and smooth will make a perfectly elegant offering.

Instead of icing, cake tops can be dusted with powdered sugar. You can choose to use a stencil for a more decorated appearance, or just the powdered sugar for a clean look.

Edible decorations are a beautiful yet simple cake decorating technique. The use of sprinkles, candy, nuts, and coconut pressed into the icing before it sets, will make your cake stand out.

To apply a textured look for your cake decorating, use a small cardboard comb, available in baking supply stores. 

Piping is achieved by using a pastry bag fitted with a metal tip that is held on by a coupler. This is your most important tool for cake decorating. You can make lines, words, shells, flowers, and many other designs on the top or sides of the cake. Fill the bag with no more than 1 cup of icing at a time, twist the top of the bag and keep steady pressure when piping the design. Use your other hand to guide the tip. It is wise to find out everything you can about piping before you begin.


Fondant a smooth white paste, is used in complicated cake decorating. Fondant is kneaded and rolled to cover cakes with a sleek smooth layer of icing. It is also used to make designs that are 3-D. It is less tasty than buttercream, but the cake will look sleek and elegant.


Friday, December 14, 2018

What About Candied Flowers For Cake Decorating

Chocolate cake with candied violets - Photo: Wikimedia
Edible flowers are often used as a garnish or as an ingredient in salads. While not all flowers are edible, there are many out there that are. Very few supermarkets carry edible flowers, but they are available at specialty markets that carry gourmet produce. These flowers can be stored up to a week in the refrigerator as long as they are wrapped well. This is fine if they are to be used in a salad, but when they are used in cake decorating they need to be fresh.

You should never eat flowers that have been sprayed with pesticides. Some of the most popular edible flowers are:

Nasturtiums have a Peppery flavor, Chive blossoms taste like a mild sweet onion, Roses, Violas and Pansies taste a bit like grapes. Other edible flowers are apple blossoms, almond, lavender, borage, chamomile, lovage, lemon, orange blossoms, plum blossoms, peach blossoms, and squash blossoms. We also have daisies, chrysanthemums, geraniums, marigolds, jasmine, lilacs, and violets. 

Candied Flowers

Candied flowers are great for desserts and in cake decorating.  Here is a recipe to make your own.

Time to prepare: 8 hrs. and 15 minutes
Yield: 2 dozen flowers.
  • 1/4 cup beaten egg whites
  • 1/2 cup superfine sugar
  • 2 cups edible flowers of your choice
Clean and blot flowers dry with a paper towel. With a paintbrush, brush on a thin layer of egg white on each side of the flower petals or blossoms. Place flowers into a shallow bowl of superfine sugar and sprinkle more sugar over the flowers so that they are coated. Make sure all of the flowers have been sprinkled with sugar. Remove flowers and place them on a sheet of waxed paper. Sprinkle each flower with another layer of sugar, again, make sure the entire flower gets a layer of sugar. 

Allow flowers to dry on the waxed paper for 8 hours. Store these tasty treats in an airtight container at room temperature until they are needed.

We are seeing more real flowers and fruit in cake decorating than ever before. The addition of these wonderful edible gifts of nature gives the cake an elegant look. Whether you are making a wedding, anniversary, retirement, birthday, or a cake for any special occasion, you will get many compliments on your choice of decoration. 

Cake decorating can be a bit frustrating and time-consuming, but once you learn the techniques and utilize the newest ideas when cake decorating, you will find that it can be fun, rewarding, and lucrative. Most cake decorators have an artistic background or artistic talent.

If you are thinking of starting a cake decorating business in your home you will need to keep up with the latest trends in cake decorating to be able to offer your clients new unique and wonderful choices. As with anything, designs get old, while some will stick with the traditional white or ivory for a wedding cake, but there are those who want to step out of the mold and have a little color in their wedding cake.


Monday, April 23, 2018

How To Make Candied Fruit For CAKE DECORATING

English: Home made cake decorated with grapes,...
Homemade cake decorated with grapes, candied cherries, and slices arranged as number 9
 (Photo credit: 
Wikipedia)
I remember my mother making fruit cake, she would use candied cherries that she would buy them in little airtight containers. They came in two colors, red and green, but they did not have the best taste. The candied fruit available now is much more beautiful and tastier than it was then. Trust me it isn't just for fruitcakes anymore.

Making your own candied fruit to use as a garnish for dishes, in cookies, as a snack, and in cake decorating. Making candied fruit is a simple process. You infuse fruits and citrus peelings in a sugar syrup. You can candy orange wedges, orange peel, lemon peel, grapefruit peel, pineapple and fresh cherries. You can also candy fruits, such as carrots for carrot cake decorating.

You will need two saucepans, one for making the syrup, and another to blanch the fruit. This is a recipe for a Candied orange peel.

Simple Syrup

This syrup is used for making candied fruits, adding flavor to cold drinks, and adding moisture to sponge cake. There are different strengths of simple syrup for different uses. Thin simple syrup, made with 1 part sugar to 2 parts water, is used to brush on cake layers, mostly sponge cake, to provide extra moisture and sweetness. A medium simple syrup is made with equal parts of sugar and water. This is excellent for adding sweetness to mixed drinks, coffee, iced tea and to candy fruit. A syrup made of 2 parts sugar and 1 part water is used as a base for sorbet and making rock candy.

Combine equal parts of sugar and water in a medium saucepan. Bring to a boil and let the sugar dissolve. You do not need to stir the syrup, but if you do it will do no harm. You can flavor the syrup. Take the syrup off the heat and cool slightly. Stir in 1 or 2 tsp. Of vanilla for a basic vanilla syrup. This syrup can be kept in a lidded jar in the refrigerator for up to a month.

Remove the bottom and top of an orange. Set the flat end of the orange on a cutting board. With a sharp paring knife, slice the peel off in strips, starting at the top and slicing downward, following the curve as much as possible. Don't worry about cutting off the white pith of the peel. Although it is usually bitter, blanching it will make it translucent and the syrup will sweeten it.

You can candy the peel as it is, or cut into strips that are 1/4 inch wide, to use in cake decorating and garnishes. You can also dip it in chocolate and use it as a snack. Larger peels, like grapefruit, should be cut into strips for even cooking.

Place the peel in a pot of cool water. Bring water to a rolling boil, remove from heat and transfer the peel into a colander to drain. Repeat the process twice more. For grapefruit or a more tart flavored fruit, you will need to blanch them seven or eight times. Cherry and pineapple do not need blanching and can be placed directly into the syrup. Between blanching taste the peel, if it is tender it has been blanched enough. Place the peel into the pot of syrup and bring to a low simmer. Let simmer for 15 to 30 minutes or until the orange rind becomes translucent and the peel tastes sweet and tender


Remove the pot from heat and let it cool. The orange rind can be stored in its own syrup for weeks in the refrigerator. You may choose to drain them and roll them in sugar. Sugared rinds tend to dry out quite fast and should be eaten within a couple of days. You can dry the peel and dip it in tempered chocolate to make it last a bit longer.

You can use the orange flavored syrup in other drinks or dishes. Nothing really goes to waste!


Sunday, March 18, 2018

How To Make Candied Fruit For Cake Decorating

Photo: Pixabay
I remember my mother making fruit cake, she would use candied cherries that she would buy them in little airtight containers. They came in two colors, red and green, but they did not have the best taste. The candied fruit available now is much more beautiful and tastier than it was then. Trust me it isn't just for fruitcakes anymore.

Making your own candied fruit to use as a garnish for dishes, in cookies, as a snack, and in cake decorating. Making candied fruit is a simple process. You infuse fruits and citrus peelings in a sugar syrup. You can candy orange wedges, orange peel, lemon peel, grapefruit peel, pineapple and fresh cherries. You can also candy fruits, such as carrots for carrot cake decorating.

You will need two saucepans, one for making the syrup, and another to blanch the fruit. This is a recipe for a Candied orange peel. 

Simple Syrup

This syrup is used for making candied fruits, adding flavor to cold drinks, and adding moisture to sponge cake. There are different strengths of simple syrup for different uses. Thin simple syrup, made with 1 part sugar to 2 parts water, is used to brush on cake layers, mostly sponge cake, to provide extra moisture and sweetness. A medium simple syrup is made with equal parts of sugar and water. This is excellent for adding sweetness to mixed drinks, coffee, iced tea and to candy fruit. A syrup made of 2 parts sugar and 1 part water is used as a base for sorbet and making rock candy.

Combine equal parts of sugar and water in a medium saucepan. Bring to a boil and let the sugar dissolve. You do not need to stir the syrup, but if you do it will do no harm. You can flavor the syrup. Take the syrup off the heat and cool slightly. Stir in 1 or 2 tsp. Of vanilla for a basic vanilla syrup. This syrup can be kept in a lidded jar in the refrigerator for up to a month.

Remove the bottom and top of an orange. Set the flat end of the orange on a cutting board. With a sharp paring knife, slice the peel off in strips, starting at the top and slicing downward, following the curve as much as possible. Don't worry about cutting off the white pith of the peel. Although it is usually bitter, blanching it will make it translucent and the syrup will sweeten it.

You can candy the peel as it is, or cut into strips that are 1/4 inch wide, to use in cake decorating and garnishes. You can also dip it in chocolate and use it as a snack. Larger peels, like grapefruit, should be cut into strips for even cooking.

Place the peel in a pot of cool water. Bring water to a rolling boil, remove from heat and transfer the peel into a colander to drain. Repeat the process twice more. For grapefruit or a more tart flavored fruit, you will need to blanch them seven or eight times. Cherry and pineapple do not need blanching and can be placed directly into the syrup. Between blanching taste the peel, if it is tender it has been blanched enough. Place the peel into the pot of syrup and bring to a low simmer. Let simmer for 15 to 30 minutes or until the orange rind becomes translucent and the peel tastes sweet and tender


Remove the pot from heat and let it cool. The orange rind can be stored in its own syrup for weeks in the refrigerator. You may choose to drain them and roll them in sugar. Sugared rinds tend to dry out quite fast and should be eaten within a couple of days. You can dry the peel and dip it in tempered chocolate to make it last a bit longer.

You can use the orange flavored syrup in other drinks or dishes. Nothing really goes to waste!